Abstract
Purpose
Teaching the no-scalpel vasectomy is important, since vasectomy is a safe, simple, and cost-effective method of contraception. This minimally invasive vasectomy technique involves delivering the vas through the skin with specialized tools. This technique is associated with fewer complications than the traditional incisional vasectomy (1). One of the most challenging steps is the delivery of the vas through a small puncture in the scrotal skin, and there is a need for a realistic and inexpensive scrotal model for beginning learners to practice this step.
Materials and Methods
After careful observation using several scrotal models while teaching residents and senior trainees, we developed a simplified scrotal model that uses only three components–bicycle inner tube, latex tubing, and a Penrose drain.
Results
This model is remarkably realistic and allows learners to practice a challenging step in the no-scalpel vasectomy. The low cost and simple construction of the model allows wide dissemination of training in this important technique.
Conclusions
We propose a simple, inexpensive model that will enable learners to master the hand movements involved in delivering the vas through the skin while mitigating the risks of learning on patients.
Vasectomy; Models, Biological; Surgical Procedures, Operative; Teaching
INTRODUCTION
The modern no-scalpel vasectomy has distinct advantages over the traditional incisional technique. Complication rates are lower (11 Labrecque M, Dufresne C, Barone MA, St-Hilaire K. Vasectomy surgical techniques: a systematic review. BMC Med. 2004;2:21.), with lower rates of hematoma, infection, and pain than the incisional technique (22 Cook LA, Pun A, Gallo MF, Lopez LM, Van Vliet HA. Scalpel versus no-scalpel incision for vasectomy. Cochrane Database Syst Rev. 2014;3:CD004112.). The no-scalpel technique is recommended in the most recent American Urologic Association vasectomy guidelines as one of the preferred methods of isolating the vasa (33 Sharlip ID, Belker AM, Honig S, Labrecque M, Marmar JL, Ross LS, et al. American Urological Association. Vasectomy: AUA guideline. J Urol. 2012;188:2482-91.). A disadvantage of the no-scalpel technique is that the delivery of the vasa through the scrotal skin is challenging initially and can be difficult to learn. Using a model can help learners master this step. Several studies have demonstrated the positive effects of using surgical simulation models for the acquisition of surgical skills and improvement in performance. (44 Davies J, Khatib M, Bello F. Open surgical simulation--a review. J Surg Educ. 2013;70:618-27.) Furthermore, the use of a model allows learners to practice the tricky delivery without risk of harming a patient.
TRAINING TECHNIQUE
Purchasing anatomic models can be expensive. For example, a visually realistic scrotal model sold in the US costs around $220 US from a medical supply house (http://www.ameditech.com/vasectomy/ved9.php). A simpler model, developed by Dr. John Pfenninger in 1995 (55 Pfenninger, John L., and Grant C. Fowler. Pfenninger and Fowler’s procedures for primary care. Philadelphia: Mosby Elsevier. 2011; pp. 845-60 and 1658.), provides the most tactile realism we have encountered. The Pfenninger model is available by mail order from the National Procedures Institute for around $ 35 US, plus shipping. We have further simplified this model to develop a low-cost vasectomy training tool that has a realistic feel and allows learners to gain confidence in delivering the vasa.
The major difference between our model and the Pfenninger model is the simplification of the model to the most basic components. We also concentrated on using readily available, inexpensive items as the basis for each part. This very simple scrotal model can be made using three components–a length of bicycle inner tube, a piece of latex tubing, and a Penrose drain.
After carefully analyzing other more expensive scrotal models, and after much trial and error, we have developed the optimal sizes for each part.
Inner tube from a bicycle tire. The “mountain bike” or 26x2.125 inch tubes are wider than “road” tubes, and thus better simulate the average scrotum.
Latex tubing. Latex tubing, also called “amber surgical tubing,” is available in many different sizes. The size that best replicates the feel of vasa is 1/8 inch outer diameter, 1/16 inch inner diameter, 1/32 inch wall. The tubing can be purchased from many sources, including scuba supply stores. A very similar tubing made from silicone can also be found. This silicone tubing is more brittle than the latex and does not have the same realistic feel. The silicone tubing should be avoided for vasectomy training.
Penrose drain. ¼ inch penrose drains fit nicely over the latex tubing and provide a realistic simulation for delivering the vas through fascia. A widely available size is 18 inch x ¼ inch, and this size works well in our scrotal model.
To construct the scrotal model, the latex tubing is placed inside the Penrose drain. This simulates the vas inside the fascia. This combination is placed inside the bicycle tube. This simulates the vasa inside the scrotum (Figure-1).
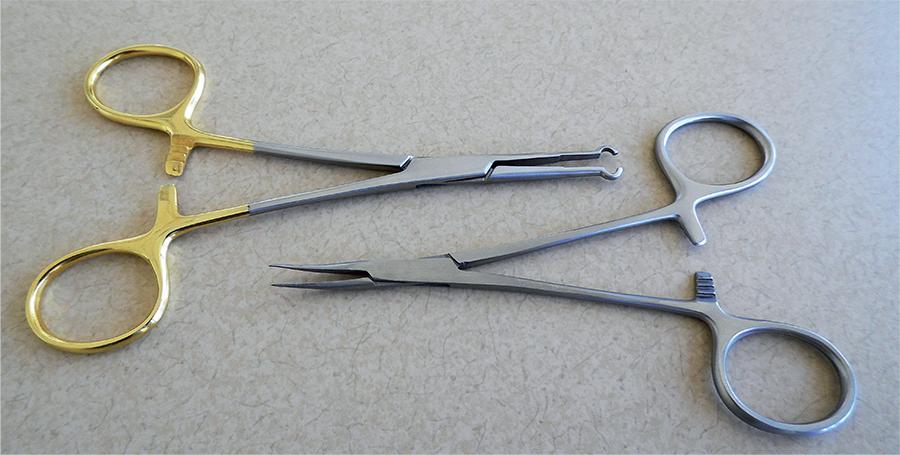
For practicing the delivery of the vasa using the no-scalpel technique, the two key instruments are the vas ring clamp and the pointed vas dissector. These tools, specifically developed for the no-scalpel procedure, allow the vasa to be delivered from the scrotum through a tiny puncture (Figure-2).
Steps of the procedure
When performing the no-scalpel vasectomy, the key components to the delivery of the vas are:
-
The “three finger grasp”
-
Grasping the vas with the vas ring clamp
-
Piercing the skin with the vas dissector
-
Spreading the skin and fascia
-
Hooking the vas
-
Pulling the vas through the skin
-
Grasping the vas with the vas ring clamp
-
Cleaning the fascia from the vas with the vas dissector
Each of these steps can be practiced with the simple scrotal model, and we will review them below.
For the sake of simplicity, we will refer to spatial directions as “upwards”, “up,” and “above”, and “downwards,” “down”, and “below.” Of course during a vasectomy, a patient would be lying supine, so the anatomically correct directions would be “patient anterior” and “patient inferior.” This can be confusing while training on a model, so the more simple concepts “up” and “down” are used during initial training and in this article.
Step 1 - The three-finger grasp
Using the non-dominant hand, place the middle finger below the scrotum and the index finger and thumb above the scrotum. Using the thumb and middle finger, palpate the vas within the scrotum. Using rolling and squeezing movements with the fingers, move the vas into the midline of the scrotum. The goal is to immobilize the vas, while simultaneously stretching taut the overlying skin. Push upward with the middle finger, and push downward with the index finger and thumb. The vas should be stretched taut between these fingers, thus tenting up the anterior skin (Figure-3).
Step 2 - Grasping the vas with the vas ring clamp
Hold the vas ring clamp with the dominant hand. Hold the palm of that hand facing away from your body, and open the tines of the ring forceps. With one tine on each side of the vas, push the ring clamp down into the skin. Simultaneously, use the middle finger of the non-dominant hand to push the vas into the ring clamp by applying pressure from below the scrotum.
As the middle finger of the non-dominant hand pushes up, close the vas ring clamp, thus trapping the vas within the ring (Figure-4).
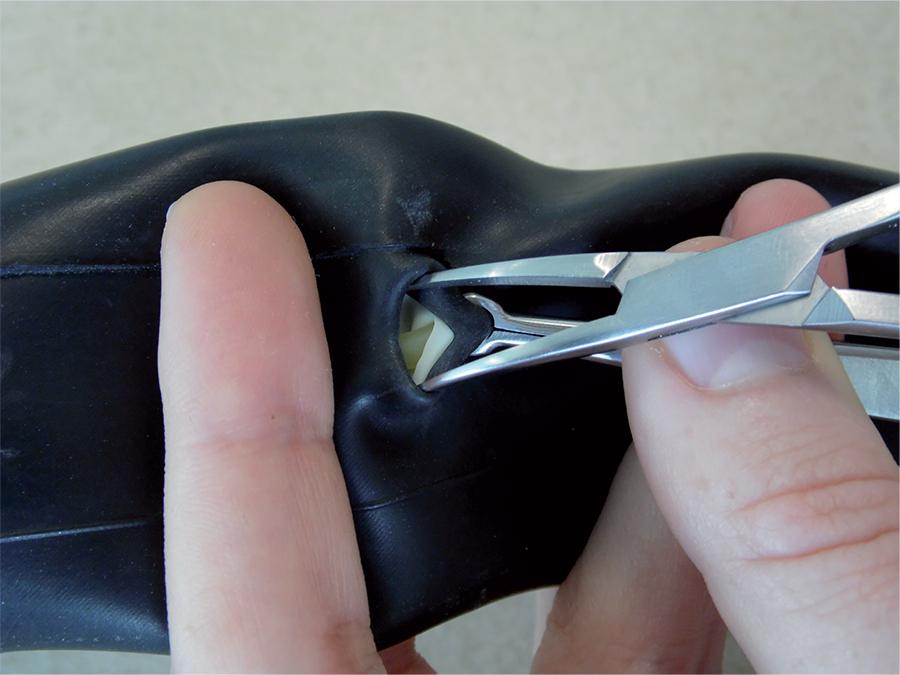
Step 3 - Piercing the skin with the vas dissector
After the vas is trapped within the vas ring clamp, lift the distal tip of the forceps to create a knuckle of skin (with the vas within that knuckle). Using the index finger of the non-dominant hand, gently stretch the skin of the knuckle away from you, thus making the skin taut at the top of the knuckle. Using the dominant hand, open the vas dissector and pierce the top of the knuckle with a single tine, i.e. with a single pointed tip of the vas dissector. It is important to pierce through the skin, through the fascia, and into the lumen of the vas in one smooth motion.
A slight “pop” is felt as the tine of the vas dissector enters the lumen of the vas (Figure-5).
Step 4 - Spreading the skin and fascia
Once the single tine has pierced through the skin, fascia, and vas, withdraw the single tine and close the vas dissector. Using the same opening you created with the single tine, insert the closed tip of the vas dissector to pierce the skin, fascia and vas with both tines. Open the tines widely to make a small tear in the upper aspect of the vas and to spread open the skin and fascia.
While opening the fascia and skin, it is very important to open the vas dissector widely in order to facilitate the subsequent delivery of the vas (Figure-6).
Step 5-Hooking the vas
Once an opening is made in the skin and fascia, withdraw the vas dissector from the skin.
Then, with the point of the vas dissector facing downward, insert the right tine of the forceps into the lumen of the vas. While slightly dropping the right elbow, rotate the right wrist such that the tips of the vas dissector point up. This lifts the vas (Figure-7).
Step 6 - Pulling the vas through the skin
As the dominant hand is hooking the vas with the vas dissector, open the vas ring clamp with the non-dominant hand. This frees the vas from the skin and allows the vas to be pulled upwards by the vas dissector as you rotate the wrist of your dominant hand. With the tip of the tine still pointing upwards, gentle traction is applied and the vas is lifted out of the skin. The open vas ring clamp can be used to gently push the skin downwards to further free the vas (Figure-8).
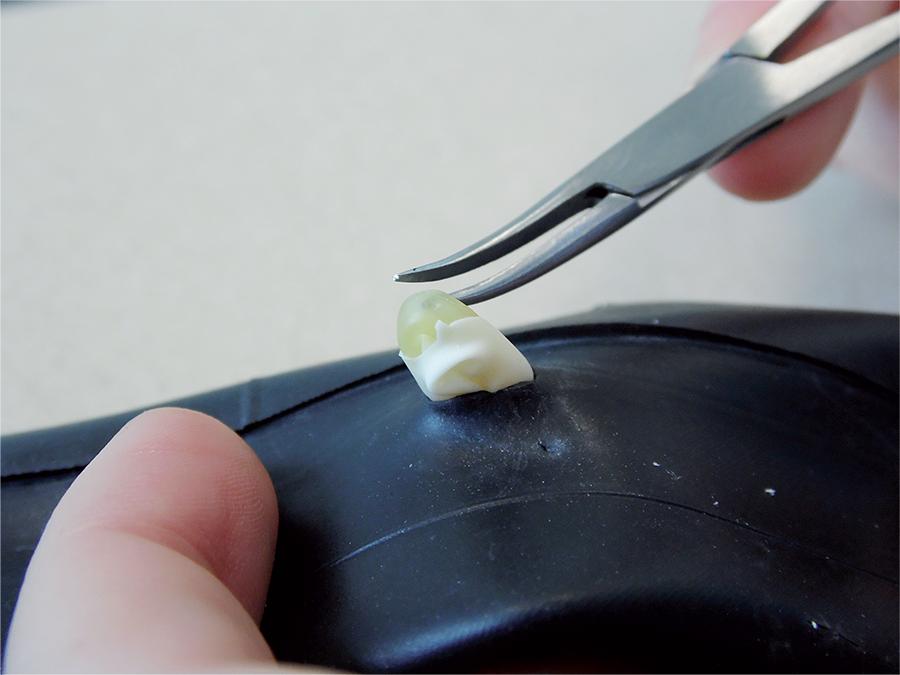
Step 7 - Grasping the vas with the vas ring clamp
After lifting the vas as far as comfortably possible out of the skin, grasp the top of the loop of vas with the vas ring clamp. This is easier if a small opening has been made in the vas when the vas was initially punctured during step 4. It is important to try to not encircle the vas with the vas ring clamp, but instead to grasp the vas firmly with the tips of the vas ring clamp (Figure-9).
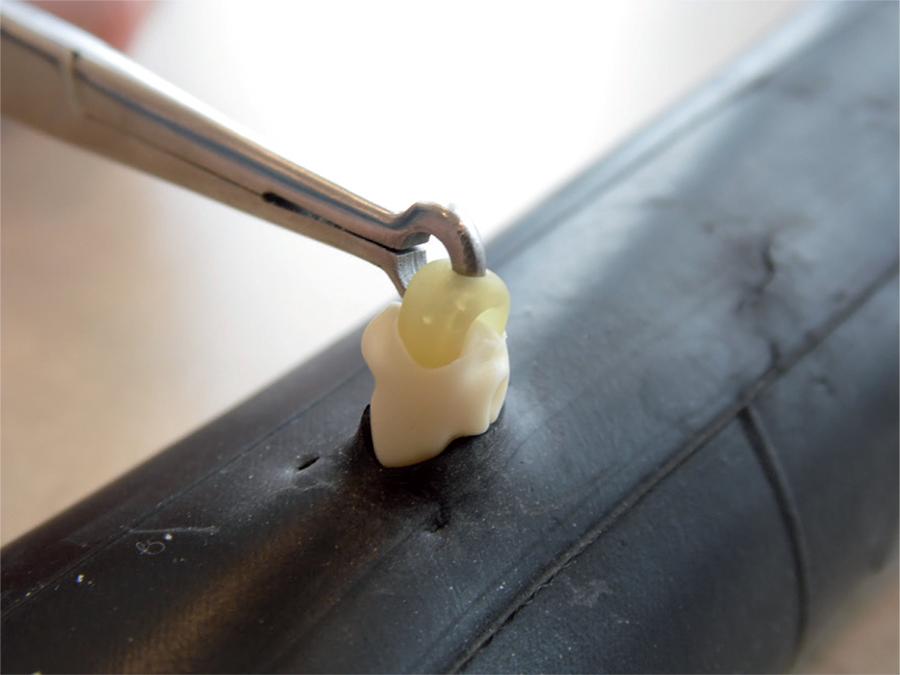
Step 8 - Cleaning the fascia from the vas with the vas dissector
Once the vas is grasped firmly by the vas ring clamp, use one tine of the vas dissector to pierce the fascia just underneath the vas ring clamp. This opening should be within the loop of vas. Once a small opening is made with a single tine, withdraw the vas dissector. Close the vas dissector and reinsert the closed tip into the small opening in the fascia. Then open the vas dissector gently to enlarge to opening in the fascia. (Figure-10).
Once the vas is delivered and cleaned of fascia, the learners can repeat these steps until they feel comfortable with the procedure. Of course, during a vasectomy on a patient, the next steps are to occlude the vas in some manner (66 Cook LA, Van Vliet HA, Lopez LM, Pun A, Gallo MF. Vasectomy occlusion techniques for male sterilization. Cochrane Database Syst Rev. 2014;3:CD003991.). A method of vas occlusion with much evidence to support its efficacy is thermal cautery of the vas lumen combined with fascial interposition (77 Labrecque M. Vasectomy occlusion technique combining thermal cautery and fascial interposition. Int Braz J Urol. 2011;37:630-5.).
This can be covered in a different workshop.
This model can be reused many times. After the learner has delivered the vas, the vas can be returned back into the scrotum by removing the tools and applying traction to the ends of the vas as they protrude from the open end of the model. Each component is easily replaceable and components can be changed individually as they wear out.
CONCLUSIONS
We have developed a realistic scrotal model that enables learners to practice a challenging step in the no-scalpel vasectomy. This model is composed of inexpensive and easily obtained materials and is straightforward to construct. We expect that this model will facilitate dissemination of the no-scalpel vasectomy, which is a safe and effective method of contraception with minimal complications.
ACKNOWLEDGEMENTS
The scrotal model developed by Dr. John Pfenninger has provided inspiration for the simplified model presented in this article.
REFERENCES
-
1Labrecque M, Dufresne C, Barone MA, St-Hilaire K. Vasectomy surgical techniques: a systematic review. BMC Med. 2004;2:21.
-
2Cook LA, Pun A, Gallo MF, Lopez LM, Van Vliet HA. Scalpel versus no-scalpel incision for vasectomy. Cochrane Database Syst Rev. 2014;3:CD004112.
-
3Sharlip ID, Belker AM, Honig S, Labrecque M, Marmar JL, Ross LS, et al. American Urological Association. Vasectomy: AUA guideline. J Urol. 2012;188:2482-91.
-
4Davies J, Khatib M, Bello F. Open surgical simulation--a review. J Surg Educ. 2013;70:618-27.
-
5Pfenninger, John L., and Grant C. Fowler. Pfenninger and Fowler’s procedures for primary care. Philadelphia: Mosby Elsevier. 2011; pp. 845-60 and 1658.
-
6Cook LA, Van Vliet HA, Lopez LM, Pun A, Gallo MF. Vasectomy occlusion techniques for male sterilization. Cochrane Database Syst Rev. 2014;3:CD003991.
-
7Labrecque M. Vasectomy occlusion technique combining thermal cautery and fascial interposition. Int Braz J Urol. 2011;37:630-5.
Publication Dates
-
Publication in this collection
Mar-Apr 2015
History
-
Received
16 May 2014 -
Accepted
28 July 2014