Abstract
The present work studies some aspects of the turning process applied on hardened steel using multilayer coated carbide tools at high cutting speeds. The influence of cutting parameters (vc, f, and depth of cut - d.o.c.) on tool temperature, tool wear, cutting forces, and surface roughness were analyzed. The current literature reports many studies using PcBN on hardened steel, but it is also important to know the results when using coated carbide tools, mainly for economical reasons. Temperature was measured by a thermocouple positioned at the lowest insert face, underneath it. Temperature near the rake face was calculated using the measured gradient within the insert thickness. To measure the gradient a special technique was used with one embedded thermocouple near the rake face and one underneath. Tool wear measurements demonstrated the capability of such tools in turning hardened steel with reasonable tool life. Forces measured resulted in relatively low values, being the radial component the largest of all. For the different cutting conditions studied, the doc has the greatest influence on force and temperature. Additionally, the best surface roughness values were smaller than 0,4 µm Ra.
temperature; HSC; cutting force; roughness; tool wear
TECHNICAL PAPERS
Turning hardened steel using coated carbide at high cutting speeds
Federico M. AneiroI; Reginaldo T. CoelhoII; Lincoln C. BrandãoIII
Ifaneiro@yahoo.es, Institute Superior Polytechnic, "José Antonio Echeverria", Ciudad Habana, Cuba
IIrtcoelho@sc.usp.br, University of São Paulo USP, Escola de Engenharia de São Carlos, São Carlos, SP, Brazil
IIIlincoln@ufsj.edu.br, Federal University of São João del Rei - UFSJ, São João del Rei, MG, Brazil
ABSTRACT
The present work studies some aspects of the turning process applied on hardened steel using multilayer coated carbide tools at high cutting speeds. The influence of cutting parameters (vc, f, and depth of cut - d.o.c.) on tool temperature, tool wear, cutting forces, and surface roughness were analyzed. The current literature reports many studies using PcBN on hardened steel, but it is also important to know the results when using coated carbide tools, mainly for economical reasons. Temperature was measured by a thermocouple positioned at the lowest insert face, underneath it. Temperature near the rake face was calculated using the measured gradient within the insert thickness. To measure the gradient a special technique was used with one embedded thermocouple near the rake face and one underneath. Tool wear measurements demonstrated the capability of such tools in turning hardened steel with reasonable tool life. Forces measured resulted in relatively low values, being the radial component the largest of all. For the different cutting conditions studied, the doc has the greatest influence on force and temperature. Additionally, the best surface roughness values were smaller than 0,4 µm Ra.
Keywords: temperature, HSC, cutting force, roughness, tool wear
Introduction
1Machining hardened steels using advanced tool materials, such as PcBN, or with multilayer coated carbide tools at high cutting speeds has certain advantages compared to the traditional machining sequence of processes, i.e., soft machining, heat treatment and grinding. Lower cutting force, residual stress, reduced cycle time and mainly low energy consumption, are some of those advantages, (Matsumoto, 1991; Panov, 1989; Boim-Sokolov, 1984).
According to Ezugwu et al. (2005) and Coelho et al., (2007), PcBN tools offer excellent performance when machining hardened steels; however, their costs are still relatively high. Therefore, it becomes interesting some studies on machining hardened steels using multilayer-coated carbide tools, which appear to be the best choice for carbide. This work assesses some aspects of turning hardened AISI 4340 (48-50HRC) using TiCN-Al2O3-TiN.
In turning operation the resultant force is divided into three components, feed force Ff, radial force Fr and cutting force Fc. Usually, in finishing operations the radial force, Fr, is the largest of all, since the doc is very small, compared to the tool nose radius (Wuyi Chen et al., 2000).
When cutting speed increases both, radial and feed forces tend to decrease, for most of the metallic parts cut with carbide tools. Trent (1991) attributes such behavior partly to the softening effect of the workpiece material, due to temperature increase, and partly to the decreasing of the chip-tool contact length. Additionally, the depth of cut (doc) apparently has an influence larger than the cutting speed, and feed rate has a moderate effect on forces.
One of the most important phenomena occurring during the machining process is the heat generation in the cutting zone. Many researchers, Shaw (1984), Komanduri-Hou (2001), and Stephenson (1993), among them, agree that most of the energy applied to the cutting process is converted into heat in the main zone of plastic deformation, the shearing plane, where the workpiece material turns itself into chip and in the secondary zone of plastic deformation, where chip slides on the rake face. Finally, some heat also arises on the tertiary zone, where the tool relief face slides on the newly machined surface. This last source is, however, not considered in most cases, either for simplicity, or because the heat generated is very small when using sharp cutting edges.
The heat generated in those zones is distributed among the tool, the workpiece, the chip, and after that to the environment. Heat generated at the shearing plane can make the cutting action easy, but it can flow into the cutting edge and that will negatively affect tool life by shortening it.
In general, the most important point in machining processes is the productivity, achieved by cutting the highest amount of material in the shortest period of time using tools with the longest lifetime. Combining all the parameters involved in the machining process to maximize productivity is, nevertheless, a very complex task and becomes much more difficult when working at high speed cutting in hardened steels.
In general, when machining steel with coated carbide tools different tool wear mechanisms occur, such as: abrasion, adhesion, oxidation and even some diffusion, which act simultaneously and in proportions depending mainly on the temperature, (Usui, 1998). The task of defining which of those mechanisms is the predominant one has become a very complex task. However, some researches relating wear mechanisms to the cutting speed have been made and some important results have been published. For example, the raise in temperature at the cutting zone occurs basically due to the cutting speed increase.
The abrasion phenomenon occurs predominantly at low cutting speeds, adhesion at medium ones, and oxidation/diffusion at high ones. The limit of growing for cutting speed depends on several other factors, such as tool-workpiece combination, contact time between them and the presence of cutting fluids. However, those findings are only indications and may not offer more than recommendations for practical applications. By superimposing wear mechanisms and their relations with cutting speed, it is possible to explain most of the tool wear observed in practice; although in some cases the causes may depend on some other factors occurring at the cutting zone and tool/workpiece contact area, (Arsecularatne et al., 2005).
The present work intends to clarify some points relating temperature, tool wear, forces and surface roughness when turning hardened steels at high cutting speeds.
Experimental Work
Cutting Forces Measurement
Cutting force was measured in the present experimental work by using three components Kistler dynamometer model 9121 mounted in the turret of an INDEX lathe model GU-600. Force signal was recorded in ".txt" format and processed using Microsoft Excel.
Temperature Measurement
Temperature measurements used embedded thermocouples (Thermocouple type K with positive thermo element: Ni90%, Cr10%, negative thermo element: Ni 95%, Mn 2%, Si 1%, Al 2%, with range: - 270ºC to 1200ºC). For gradient evaluation two thermocouples were inserted; the first one at 0.2 mm near the rake face and the second one at the interface between the indexable insert and its seat, underneath it, as schematically shown in Fig. 1.
One thermocouple was embedded at 0.2 mm near the rake face; another was at the lowest face of the carbide insert, underneath, on the insert seat. Together they were used to evaluate the temperature gradient within the insert thickness. The heat source, in this case, was an Oxyacetylene torch with very concentrated flame, used to simulate the heat generated at the chip-tool interface.
When the torch was approached to the insert rake face, both temperatures were recorded and a typical graph is shown in Fig. 2. The oscillations in Fig. 2 had occurred due the variation in the distance between the heat source and the embedded thermocouples. The tendency of temperatures was the stabilization with time after some seconds.
After estimating the temperature gradient, using the torch, only the thermocouple underneath the insert was used to measure in real machining trials. During machining trials one new edge where used for each machining condition, even during those replicated. To measure tool wear, the operation was periodically interrupted and the edge took to a microscope. Figure 3 shows the set up used for all machining experiments, in a GU-600 INDEX lathe, equipped with Siemens 810D CNC, containing 18kW and 5,000 rpm at the spindle. Workpieces were clamped between a 3 jaw-chuck and the tailstock.
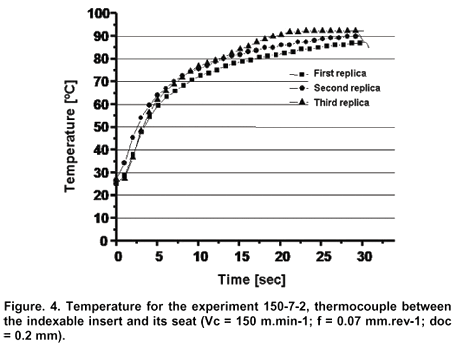
During machining, temperature increased continuously and, after around 30 seconds, it became stable. That stable value was adopted as the value for each cutting condition, as it was similarly made by some other authors (Ren, 2004 et al., EL-Wardany et al., 1996).
Indexable Inserts and Workpiece Material
The inserts were multilayer-coated carbide ISO code CNMA-120408-KR grade K-20, with TiCN-Al2O3-TiN layers of 9 µm thickness. Tool holder was DCLNL 2525 M12-2, (Sandvik, 2004). The workpieces were round bars with 50 mm in diameter and 200 mm in length made of AISI 4340 hardened and tempered to 48-50 HRC. Hardness was measured during the experiments, since the bar diameter was becoming smaller as the tests progressed. Table 1 shows the resulting of the average hardness measurements, according to diameter of the bars. The numbers 1 to 5 in Table 1 are the numbers of the bar samples.
Cutting Conditions
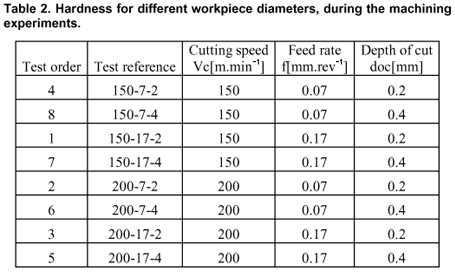
Cutting speed, feed rate and doc were specified in accordance with recommendations from the insert supplier for that application and tested at two different levels each one, within the recommended range. Cutting speed values were 150 and 200 m.min-1, feed rate, 0.07 and 0.17 mm.rev-1 and doc 0.2 and 0.4 mm. Values are shown in Table 2 in a 23 full factorial arrangement with 3 replicates.
Table 1 shows that hardness did not significantly change from the external layers to the core.
Flank Wear Measurement
Tool wear was measured with an optical microscope Zeiss Axiotec Z100 using lens of 5x magnification. First flank wear was measured after initial 25 mm cutting length and the subsequent ones with at least this interval. Each machining condition was replicated three times, with new edges and curves were plotted with the average values.
Results and Discussion
Temperature Measurement
Figure 4 shows a typical temperature result when measuring with the embedded thermocouple at the underneath face. It can be noticed that temperature increases rapidly with machining time, at the beginning, and the three curves show approximately similar results, being stable after 30 seconds.
After some machining time, temperature curves tend to be reasonably stable, since it achieves equilibrium between heat generated at the three plastic deformation zones and that dissipated throughout workpiece, chip and tool to the environment. For all the machining conditions, tested curves were very similar.
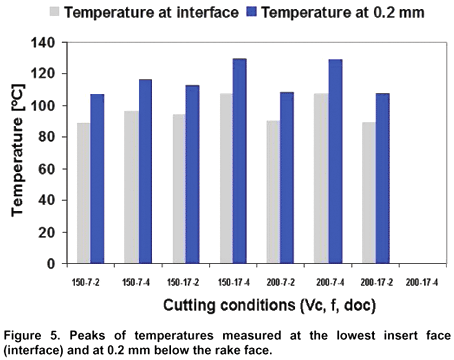
Figure 5 shows the stable temperature for each machining condition (referred by their "Code" according to Table 2) and the calculated value at 0.2 mm from the rake face, using the estimated gradient employing two embedded thermocouple, as described above.
The condition vc = 200 m.min-1, f = 0.17 mm.rev-1 and doc 0.4 mm, referred in Table 2 as Code "200-17-4" was not included in Fig. 5, because the flank wear reached high value in very short period of time and temperature did not stabilize during the whole cutting length.
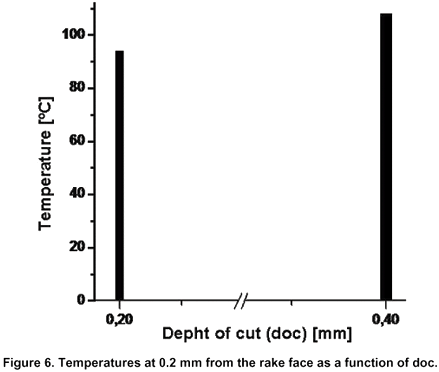
The results found near the rake face are comparable to similar ones made by other authors, (Shaik 1995; El-Wardany et al., 1996). The Analyzes of Variance (ANOVA), using STATGRAPHICS software, found that among all the machining parameters tested; only the doc has shown to be significant within 95% confidence interval for the temperature near the rake face. Fig. 6 shows the tendency of temperature as a function of doc.
When the depth of cut increases from 0.2 to 0.4 mm, there is a tendency on the contact length to grow, which may account for the increase in temperature on the rake face. Additionally, because of the increase on the cross section of the uncut chip thickness, and also on removal rate, a significant temperature increase, as a whole, is to be expected, together with a proportional increase in forces, as it will be shown ahead in this text. Similar results have been reported by (Ren et al., 2004; Wen-Chou et al., 1997; Grzesik, 1999; Haci et al., 2006; Ng et al., 1999).
Force Measurements
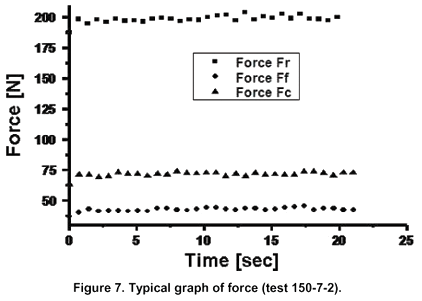
Three replicas of each test were carried out to measuring radial, feed, and cutting components of the machining force, using a new cutting edge each time. Typical curves are shown in Fig. 7 for those 3 components.
As shown in Fig.7, the forces became reasonably stable after just few seconds into the turning process. Fig 8 shows the force components for every test conditions.
The radial force showed to be the highest, because the depths of cut and the feed rates selected were significantly smaller than the insert nose radius (0.8 mm). As a result, the chip sectional area was very small, which contributes to lower cutting force, as well. When using doc of 0.2 mm radial force is around 4 to 5 times higher than the feed one. When using doc of 0.4 mm that proportion drops to around 2 to 3.
As a general trend, Fc increases with the doc and with feed rate, which was expected, since such force component is proportional to the chip cross section. Such tendency is not confirmed in the last test (200-17-2), but that may be due to the rapid tool wear, which reduced cutting area.
According to ANOVA the depth of cut, was the most significant parameter, resulting in more than 95% confidence, regarding the radial force. Fig. 9 shows the relation between such force component and the doc.
Considering the feed force component again, only the depth of cut showed significance within 95% and Fig. 10 shows the relation between these two variables.
Finally, using the statistical analysis with the cutting force, none of the variables tested showed significance within 95% confidence interval. Although the graphs show some influence of doc and feed rate on the cutting component, the range used in the present tests was probably not large enough compared to the whole variance.
Tool Wear
Fig. 11 shows a typical graph of tool wear when using vc = 150 m.min-1, f=0.07 mm.rev-1, and doc=0.2 mm. Tree replicas showed basically the same pattern, i.e., at the beginning the tool wear rate was high up to approximately the first 1000 m and after that, the growth rate was low.
According to Poulachon et al. (2001) and Arsecularatne et al. (2005), at the beginning of cutting, the wear tends to eliminate the edge irregularities, high pressure occurs and that concentrates heat on the edge. The coating seems to be strong enough to withstand such situation very well, since after this first accelerated wear there was low increase on wear rate, up to around 6,000 m, when the test was interrupted, judging that wear was high. Overall, the coating yielded reasonable good tool life, even machining AISI 4340 with 48-50HRC at cutting speed considered high, according to some other authors (Ezugwu et al., 2005; Liu, 2002; Kishawy-Elbestawi, 1999).
Previous work reports that PcBN insert shown low flank wear, around 14,000 m, compared to 7,000 m for the TiCN-Al2O3-TiN coating used in this work (Coelho et al., 2006). That proportionate about the double of the tool life for PcBN, but when prices are compared, it may lose some of the tool life advantages. The durability of PcBN can be the double; but the cost of an edge is more than that of TiCN-Al2O3-TiN.
This demonstrated that machining medium hardened steels with TiCN-Al2O3-TiN inserts tends to be more productive. It can be suggested that the relatively good performance of the coated carbide tools on machining hardened steel relied on the coating combination of layers, which seems to be the adequate one for such applications. It also appears that the coated layers were able to keep a relatively low temperature on the WC substrate, according to the estimated values, based on the gradient. Similar results were also reported by some other authors, such as Huang (2005), Ezugwu et al. (2005).
Surface Roughness
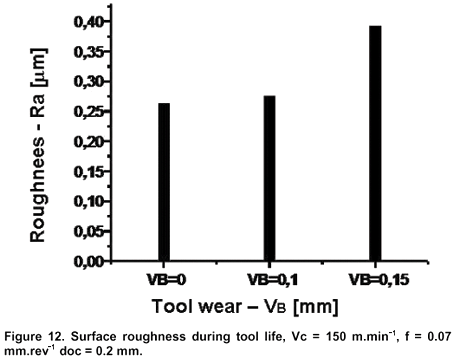
Surface roughness was compared with values obtained by grinding operation. It seems that values obtained in turning with coated carbide are similar to those normally obtained by normal grinding. Fig. 12 shows average values during the whole tool lifetime.
It can be observed that feed rate was the most significant parameter affecting surface roughness, as expected from theory. Additionally, the values are relatively low, considering a turning operation, and some values can be as low as those obtained by grinding operations. Fig. 13 shows the values of roughness during tool wear for a particular cutting condition.
Surface roughness values increased according to flank wear, which is a typical behavior, when tool wears uniformly without catastrophic failure. As a general overview, the obtained results of surface roughness values were below 0.9 µm Ra and using f = 0.07mm it was below 0.4 µm, similar to results obtained before by Kishawy-Elbestawi (1999).
Conclusions
From the experimental trials developed at the present work, some conclusions can be stated. The adopted experimental procedure, by measuring the temperature underneath the carbide insert and using the gradient to calculate values near the rake face, in real machining conditions, has shown reasonable values. Some resulted relatively low, compared to some other previous works, although within the same range.
Temperature near the rake face increases significantly when the doc changes from 0.2 to 0.4 mm. The increase in contact length between chip and rake face can be responsible, since it grows, together with uncut chip cross section.
The results obtained, show that only the doc is significant within 95% confidence interval, for the temperature, in the range tested.
Tool life was particularly long for the coated carbide tested, yielding around 7,000 m of cutting length with relatively low flank wear. If that is compared to PcBN tool at similar cutting conditions, it is about half tool life, but PcBN prices are, probably, more then twice coated carbide price.
Surface roughness values were all below 0.9 µm Ra and at the best cutting conditions, it could be kept below 0.4 µm Ra. Those values are inside the range normally obtained by grinding operations at normal cutting conditions.
Force measurements demonstrated that the radial component was the highest of all and only the depth of cut was statistically significant in a 95% confidence interval for components radial and feed, within the range tested. The cutting components were the lowest and no significant influence was found, against the tested parameters.
Paper accepted February, 2008.
Technical Editor: Anselmo Eduardo Diniz.
- Arsecularatne, J. A; Zhanga, C.; Montross, C. (2006) "Wear and tool life of tungsten carbide, PCBN and PCD cutting tools". International Journal of Machine Tools & Manufacture. Vol. 46, Nş. 5, pp. 482-419.
- Boim, N. G.; Sokolov, I. N. (1984) "The use of super-hard material and ceramic cutting tools in machine tool construction". Soviet Engineering Research. Vol. 4, Nş7, pp. 5556.
- Coelho, R. T., Eu-Gene Ng, M., Elbertawi, M. A. (2006) "Tecnologia de Usinagem com Altas Velocidades de Corte", projeto aprovado pela FAPESP sob Nş 04/16031.
- El-wardany, T. I., Mohammed, E., Elbestawi, M. A. (1996) "Cutting temperature of ceramic tools in high speed machining of difficult to cut materials". International Journal of Machine Tools & Manufacture. Vol. 36. Nş. 5. pp. 611-634.
- Ezugwu, E. O., Silva, R. B., Bonney, J. A., Machado, R. (2005) "Evaluation of the performance of CBN when turning Ti-6Al-4V alloy with high pressure coolant supplies". International Journal of Machine Tool & Manufacture. Vol. 45, Nş 9, pp. 1009-1014.
- Grzesik, W. (1999) "Experimental investigation of the cutting temperature when turning with coated indexable inserts". International Journal of Machine Tools & Manufacture. Vol. 39, Nş 3, pp. 355369.
- Haci, S.; Faruk, U.; Suleyman, Y. (2006) "Investigation of the effect of rake angle and approaching angle on main cutting force and tool tip temperature". International Journal of Machine Tools & Manufacture. Vol. 46, Nş 2, pp. 132141.
- Huang, H.; Chen, W.K.; Kuriyagawa T.; Yosihara, N. (2005), "Machining of micro aspherical mould inserts, Precision Engineering, Volume 29, Issue 3, July 2005, Pages 315-323.
- Kishawy, H. A.; Elbestawi, M. A. (1999) "Effects of process parameters on material side flow during hard turning". International Journal of Machine Tools & Manufacture. Vol. 39, Nş 7, pp. 10171030.
- Komanduri, R., Hou, Z. B. (2001) "A review of the experimental techniques for the measurement of heat and temperatures generated in some manufacturing processes and tribology. Tribology International. Vol. 34, Nş 10, pp. 653682.
- Liu, X. L., Wen, D. H., et al. (2002). "Cutting Temperature and tool wear of hard turning hardened bearing steel". Journal of Material Processing Technology. Vol. 129, pp. 200-206.
- Matsumoto, Y. (1991) "Effect of machining process on the fatigue strength of hardened AISI3040 steel", Transactions of ASME, Journal of Engineering for Industry. Vol. 113, pp. 154159.
- Ng, E-G, Aspinwall, D. K., Brazil, D., Monaghan, J. "Modelling of temperature and forces when orthogonally machining hardened steel". International Journal of Machine Tools & Manufacture. Vol. 39, Nş 6, pp. 885903.
- Panov, A. A. (1989) "Intensifying components machining by means of tools provided with synthetic superhard materials and ceramics". Soviet Engineering Research. Vol. 9, Nş11, 4549.
- Poulachon, G.; Moisan, A.; Jawahir, I. S. (2001) "Tool wear mechanisms in hard turning with polycrystalline cubic borom nitride tool". Wear. Vol. 250, Nş1/12, pp. 576-586.
- Ren, X. J.; Yang, Q. X.; James, R. D.; Wang , L. (2004) "Cutting temperatures in hard turning chromium hard facings with PCBN tooling". Journal of Materials Processing Technology. Vol. 147, Nş1, pp. 3844.
- SANDVIK (2004) "Ferramentas para torneamento". Catálogo técnico, 978 p.
- Shaik, A.R.; Shivakumar R., Faruk, C.; Cohen, P.H. (1995), A new forward temperature estimator for remote thermocouple sensing in machining, International Journal of Mechanical Sciences, Volume 37, Issue 5, May 1995, Pages 511-526.
- Shaw, M. C., 2004, "Metal Cutting Principles", Ed. Oxford University, England, 651 p.
- Stephenson, D. A. (1993) "Tool-Work Thermocouple Temperature Measurement-Theory an Implementation". Transactions of ASME Journal of Engineering for Industry. Vol. 115, pp. 432-437.
- Trent, E. M. "Metal Cutting", 3rd ed., Butterworth-Heinemann, 1991.
- Usui, E. (1998) "Progress of predictive theories in metal cutting", JSME Int. J. Ser. III 31 (2), pp. 363369.
- Wen-Chou, C.; Chung-Chen, T. and Ping-Wen, L. (1997) "Determination of temperature distributions on the rake face of cutting tools using a remote method". International Communications in Heat and Mass Transfer, Vol. 24, Nş. 2, pp. 161-170.
- Wuyi, C. (2000) "Cutting forces and surface finish when machining medium hardness steel using CBN tools". International Journal of Machine Tools & Manufacture. Vol. 40, Nş 3, pp. 455466.
Publication Dates
-
Publication in this collection
10 July 2008 -
Date of issue
June 2008
