Abstract
Vernalization, natural or artificial, is a physiological requirement of some plants to meet the need for low temperatures for its complete development to occur. The objective of this article is to describe a protocol of transforming a domestic refrigerator into a BOD (Biochemical Oxygen Demand) prototype aimed at vernalizing propagating materials statice crop. The first step is to install a temperature controller to maintain a constant temperature inside the refrigerator (10 °C). Thinking of seedling vernalization, it is still necessary to install a system of lights inside the refrigerator. The control of the time that the lights remain on inside the prototype is carried out by installing a Timer adjusted so that the lights remained on, uninterruptedly, for 10 hours. To test the effective ness of the prototype, an on-farm experiment was carried out with the statice (Limonium sinuatum L.) crop at 5 locations in Rio Grande do Sul, Brazil. The seedlings were vernalized at an internal temperature of 10 °C and photoperiod of 10 hours for 3 weeks. The duration of this experiment was 8 months and at the end of this observed that statice plants were correctly vernalized because the plants emitted flower stems and showed satisfactory development throughout the growing cycle. Therefore, that the adaptation of a domestic refrigerator as a BOD economically viable and easy mounting prototype is possible. Being an excellent alternative to small producers.
Keywords:
Limonium sinuatum L.; photoperiod; propagation; temperature
Resumo
A vernalização, natural ou artificial, é uma exigência fisiológica de algumas espécies para suprir a necessidade por baixas temperaturas para que ocorra o seu completo desenvolvimento. O objetivo deste artigo é descrever um protocolo da transformação de uma geladeira doméstica em um protótipo de BOD (Biochemical Oxygen Demand) visando à vernalização de materiais propagativos da cultura da estatice. O primeiro passo consiste na instalação de um controlador de temperatura para que se mantenha uma temperatura constante no interior da geladeira (neste caso 10 °C). Pensando em vernalização de mudas, ainda é necessário à instalação de um sistema de luzes no interior da geladeira. O controle de tempo em que as luzes permanecem acesas no interior do protótipo é realizado através da instalação de um Timer ajustado para que as luzes permaneçam ligadas, ininterruptamente, por 10 horas. Para testar a eficácia do protótipo foi realizado um experimento on farm com a cultura da estatice (Limonium sinuatum L.) em 5 locais no Rio Grande do Sul. As mudas foram vernalizadas à temperatura interna de 10 °C e fotoperíodo de 10 horas durante 3 semanas. A duração deste experimento foi de 8 meses e ao fim deste observou-se que as plantas de estatice foram corretamente vernalizadas, pois as plantas emitiram hastes florais e apresentaram desenvolvimento satisfatório ao longo do ciclo. Portanto, a adaptação de uma geladeira doméstica em um protótipo de BOD de forma economicamente viável e de fácil montagem é possível. Sendo uma excelente alternativa à pequenos produtores.
Palavras-chave:
Limonium sinuatum L. fotoperíodo; propagação; temperatura
Introduction
Vernalization is a physiological process required by some species for flowering to occur through exposure to low, non-freezing temperatures. Without cold treatment, species that need vernalization do not bloom even under ideal conditions of temperature and photoperiod (Taiz and Zeiger, 2017TAIZ, L; ZEIGER, E. Fisiologia e Desenvolvimento Vegetal. 6ed. Porto Alegre: Editora ARTMED, 2017. 952p.). Plants that are not vernalized and that need to fulfill this requirement for their development undergo an extension of the vegetative phase by increasing the number of leaves and/or staying in this phase (Bouché et al., 2017BOUCHÉ, F.; WOODS, D.P.; AMASINO, R.M. Winter memory throughout the plant Kingdom: different paths to flowering. Plant Physiology, v.173, n.1, p.27-35, 2017. https://doi.org/10.1104/pp.16.013
https://doi.org/10.1104/pp.16.013...
).
Several important agricultural species need vernalization for their production. Generally, this process occurs in plants that are propagated through vegetative propagules (bulbs, corms, tubers or rhizomes) as is the case of onion when vegetatively propagated (D’Angelo and Goldman, 2018D’ANGELO, C.J.; GOLDMAN, I.L. Temporal aspects of vernalization and flowering in long-day storage onion. Journal of the American Society for Horticultural Science, v.143, n.6, p.446-453, 2018. https://doi.org/10.21273/JASHS04495-18
https://doi.org/10.21273/JASHS04495-18...
), lily (Li et al., 2016LI, W.; LIU, X.; LU, Y. Transcriptome comparison reveals key candidate genes in response to vernalization of Oriental lily. BMC genomics, v.17, n.1, p.21, 2016. https://doi.org/10.1186/s12864-016-2955-0
https://doi.org/10.1186/s12864-016-2955-...
), garlic (Wu et al., 2016WU, C.; WANG, M.; DONG, Y.; CHENG, Z.; MENG, H. Effect of plant age and vernalization on bolting, plant growth and enzyme activity of garlic (Allium sativum L.). Scientia Horticulturae , v.201, p.295-305, 2016. https://doi.org/10.1016/j.scienta.2016.02.006
https://doi.org/10.1016/j.scienta.2016.0...
), amaryllis (Andini et al., 2019ANDINI, U.R.; SETIADO, H.; SIREGAR, L.A.M. The Effect of vernalization on the appearance of local amaryllis (Hippeastrum sp.) plants in the Land of Karo and West Sumatera. Jurnal Pertanian Tropik, v.6, n.1, p.24-33, 2019. https://doi.org/10.32734/jpt.v6i1.3036
https://doi.org/10.32734/jpt.v6i1.3036...
) and gladiolus (Tomiozzo et al., 2019TOMIOZZO, R.; UHLMANN, L.O.; BECKER, C.C.; SCHWAB, N.T.; STRECK, N.A.; BALEST, D.S. How to produce gladiolus corms? Ornamental Horticulture, v.25, n.3, p.299-306, 2019. https://doi.org/10.1590/2447-536x.v25i3.2048
https://doi.org/10.1590/2447-536x.v25i3....
). However, crops that are propagated by stolons, such as strawberry (Diel et al., 2017DIEL, M.I.; PINHEIRO, M.V.M.; COCCO, C.; THIESEN, L.A.; ALTÍSSIMO, B.S.; FONTANA, D.C.; CARON, B.O.; TESTA, V.; SCHMIDT, D. Artificial vernalization in strawberry plants: Phyllochron, production and quality. Australian Journal of Crop Science, v.11, n.10, p.135-1319, 2017.), and by seeds such as wheat (Shourbalal et al., 2019SHOURBALAL, S.K.S.; SOLEYMANI, A.; JAVANMARD, H.R. Shortening vernalization in winter wheat (Triticum aestivumL.) using plant growth regulators and cold stratification. Journal of Cleaner Production, v.219, s/n, p.443-450, 2019. https://doi.org/10.1016/j.jclepro.2019.02.030
https://doi.org/10.1016/j.jclepro.2019.0...
) and statice (Shillo, 1976SHILLO, R. Control of flower initiation and development of statice (Limonium sinuatum) by temperature and daylength. Acta Horticulturae, v.64, s/n, p.197-204, 1976.) may also require vernalization.
In regions with low air temperature at specific times (winter months), the requirement for vernalization is met naturally in the environment, as is the case in subtropical regions in southern Brazil (Parry, 2019PARRY, M.L. Climate change and world agriculture. Parmesan: Routledge, 2019.). In this case, the plants receive the necessary cold during the vegetative phase, which occurs in the winter months (period with vernalizing temperatures), and bloom in the spring months. In these regions, the production of these species is only possible once a year.
In order to make production possible in the off-season, that is, at times of the year when the environmental conditions are not sufficiently adequate for inducing flowering, there is the possibility of applying the technique of artificial vernalization. Artificial vernalization consists of submitting propagating materials or seedlings to low temperatures through the use of cold chambers (Diel et al., 2017DIEL, M.I.; PINHEIRO, M.V.M.; COCCO, C.; THIESEN, L.A.; ALTÍSSIMO, B.S.; FONTANA, D.C.; CARON, B.O.; TESTA, V.; SCHMIDT, D. Artificial vernalization in strawberry plants: Phyllochron, production and quality. Australian Journal of Crop Science, v.11, n.10, p.135-1319, 2017.).
For the vernalization of seedlings, which need light to maintain their physiological processes, the use of cold chambers is not suitable (Grez et al., 2020GREZ, J.; CONTRERAS, E.; SÁNCHEZ, S.; ALCALDE, J.A.; GAMBARDELLA, M. Floral induction and dormancy behaviour in ‘Chilean white strawberry’ (Fragaria chiloensis (L.) Mill. subsp. chiloensis f. chiloensis). Scientia Horticulturae, v.274, p.1-6, 2020. https://doi.org/10.1016/j.scienta.2020.109648
https://doi.org/10.1016/j.scienta.2020.1...
). In these cases, it is recommended to use growth chambers, laboratory greenhouses or BOD (Biochemical Oxygen Demand) incubators, popularly known as laboratory refrigerators. In this device it is possible to control the temperature and the light supplied to the plants, simulating different environmental conditions. However, devices such as growth chambers and BODs, in general, are expensive and require specialized labor for handling, which makes them difficult to be used by farmers (on farm). Thus, it is important to develop or adapt simpler and more economical devices that make it possible to use the technique of artificial vernalization at the producer level.
In this context, the objective of this article is to describe a protocol process for the construction of a BOD prototype based on the adaptation of a domestic refrigerator, to allow access to this type of equipment by rural producers without the need costly investments.
Materials and Methods
A domestic refrigerator was used in this work. In this refrigerator, a temperature controller (Full Gauge MT 512E 2HP) and a lighting system (LED type lights) were installed and time was controlled using a timer, in order to simulate the daylight hours (photoperiod). The step-by-step installation of each of these components is described below.
Installing the temperature controller
The temperature controller used in this work is simple to install and easily found in the market for electronic materials for refrigerators and the technical specifications required for a temperature controller for this use are described in Figure 1. Other models of temperature controllers can also be used; however, you should consult the installation method through their manual, as there may be differences between brands and models.

Technical specifications of the equipment used in the study. Adapted from the installation manual of the temperature controller Full Gauge MT 512E 2HP.
The function of the temperature controller is to activate the compressor (cooling component of the refrigerator) when the temperature sensor captures the desired minimum temperature and turn it off when the sensor captures the maximum programmed temperature, that is, activating or deactivating it according to the setting selected on the temperature controller display. For this item there are more functions, but this is the most important and relevant in this stage and for this purpose. The first step is to check the voltage of the electrical network used to turn on the refrigerator, that is, whether the voltage is 110 or 220 volts (V).
The second step is to install the 1.5 mm flexible wires that will enable the temperature controller to be energized in the refrigerator. At this moment, attention must be paid to the identification of the voltage, phase and neutral to correctly install the temperature controller. The colors of the wires must follow the NBR 5410 standard of 2010, which specifies color standards for electrical cables, as follows: black and red for phase, blue or white for neutral and green for the ground wire. Each equipment or version upgrades may have some modifications in the assembly and/or execution of the product. Therefore, the manual contained in the equipment must be consulted.
The 1.5 mm flexible wires must be connected to the terminals 9 and 10 (input where the wires are mechanically fixed) (Figure 2A), with terminal 9 for phase and terminal 10 for neutral if the voltage is 110V. If the voltage used is 220V, connect the wires to the input terminal 9 and terminal 11 (Figure 2B), with terminal 9 for the phase and terminal 11 for the neutral.

Rear interface of the temperature controller and the connections (circled in orange) for installation with voltage 110 V (A). Rear interface of the temperature controller and the connections (circled in orange) for installation in voltage 220 V (B). Adapted from the installation manual of the temperature controller Full Gauge MT 512E 2HP.
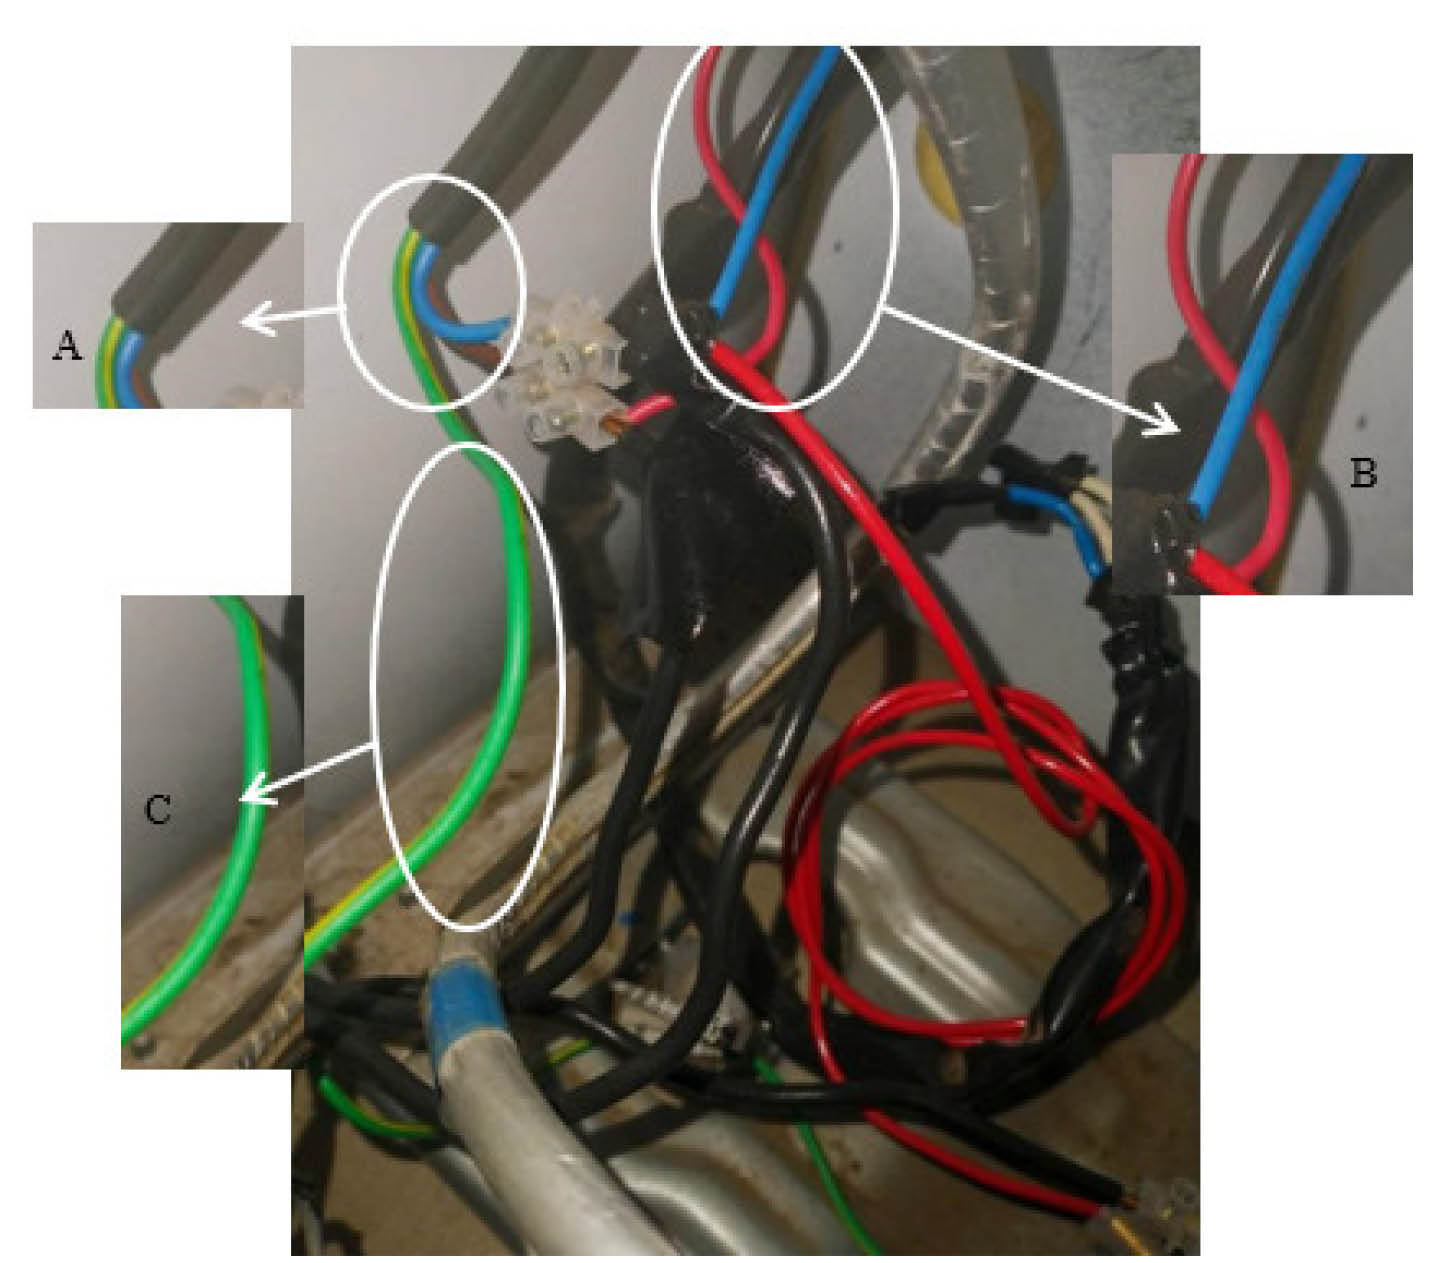
The opposite end of the wires connected to the controller must be connected to the refrigerator cables as follows: phase connected to phase, neutral connected to neutral and one of the neutral outputs will be connected to the refrigerator compressor. After identifying the phase and neutral of the other electronic components of the refrigerator (internal light, light panel and defrost fan), they must be connected with the respective wires of the refrigerator’s power cable (Figure 3)

Image A: Power cable. Image B: neutral wire of the refrigerator’s internal equipment in blue and 220 V phase wire in red. Image C: Ground wire.
With the temperature controller already connected to the refrigerator’s power cable, we proceed to the third step, when the temperature controller must be connected to the refrigerator compressor. The 1.5 mm flexible wire must be placed on terminal 15 (Figure 4) and taken to the refrigerator compressor, connecting it to the phase input. A wire (jumper) must be connected from terminal 9 to terminal 16, since it is from terminals 15 and 16 that the controller will control the refrigerator compressor, and the compressor wire is allocated in terminal 15 (Figure 5).

Rear interface of the temperature controller and the connections of the phase return to the refrigerator compressor. Adapted from the Full Gauge MT 512E 2HP temperature controller installation manual.

Red wire (jumper) connecting terminal 9 to 16: (A), 220V phase for the temperature controller; (B) wire from neutral to the controller; (C) 220V phase wire for the compressor.
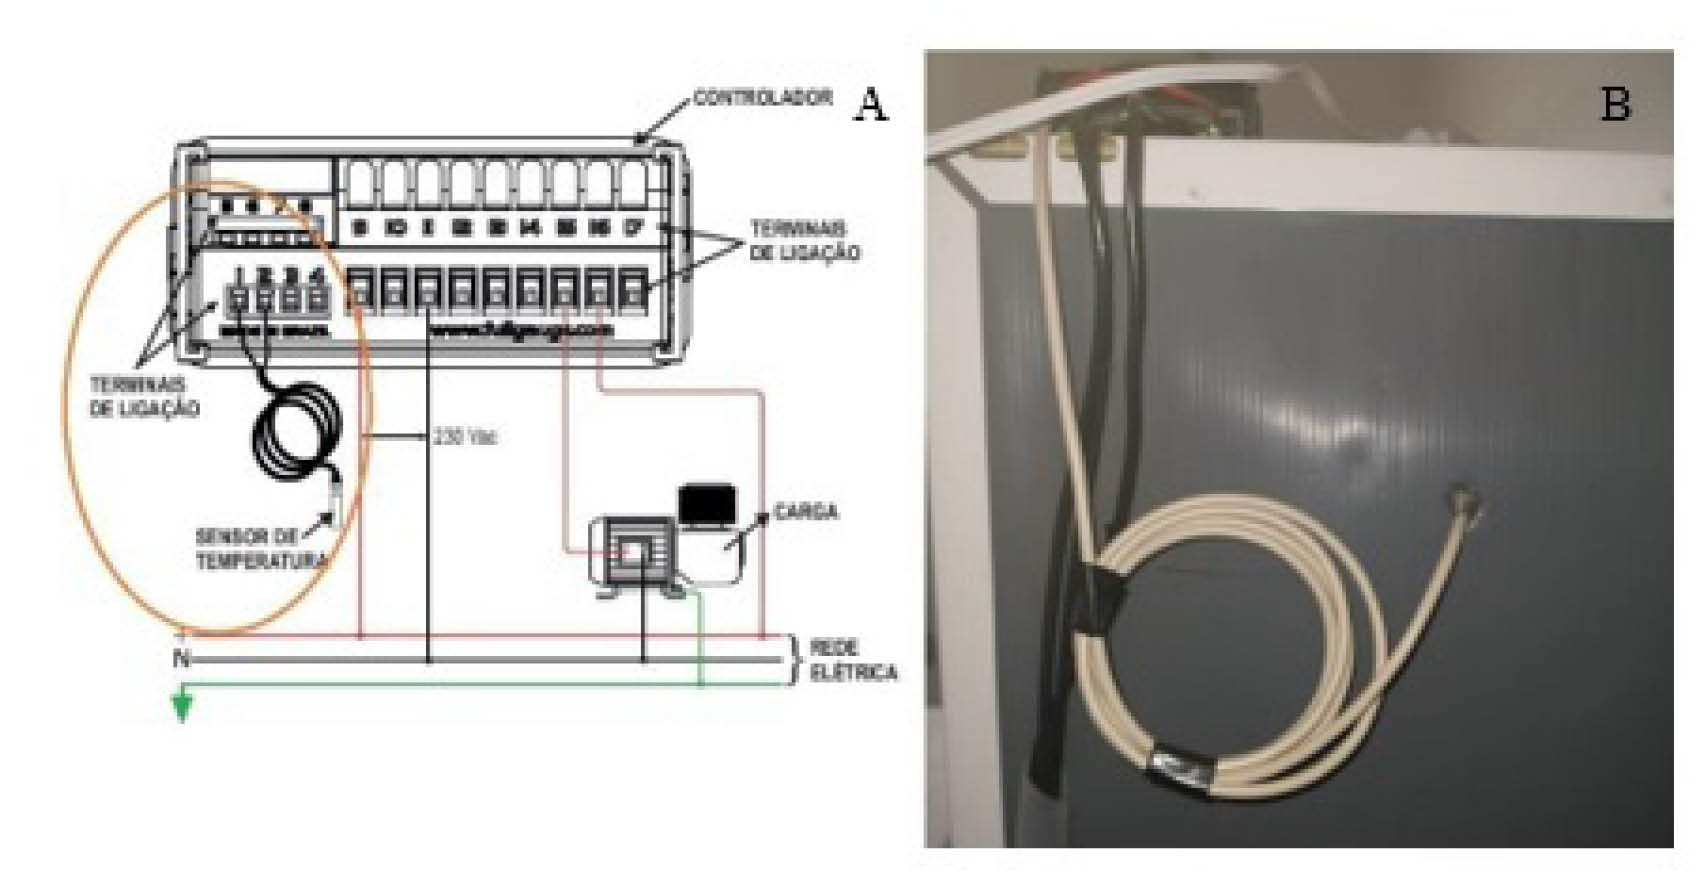
To install the refrigerator’s internal temperature sensor (Figure 6A), the back of the refrigerator (Figure 6B) must be perforated. Care must be taken when drilling so as not to damage pipes or electronic components of the refrigerator. In the refrigerators there are layers of plastic for finishing and foam for thermal insulation. It is worth noting that the diameter of the orifice must be as close as possible to the thickness of the sensor so that there is no gas exchange between the external environment and the interior of the refrigerator, so there will be no more expenditure of extra energy to maintain the desired temperature inside the refrigerator.

Installation of the temperature sensor: (A) connection of the temperature sensor to the temperature controller; (B) Extension of the sensor into the refrigerator. Adapted from the Full Gauge MT 512E 2HP temperature controller installation manual.
The temperature sensor should be positioned in a location that captures the average temperature inside the refrigerator, that is, in a location with the least possible interference. Placing the sensor too close to the refrigerator’s air vents will cause it to capture a lower temperature than the average refrigerator temperature. Another place that should be avoided is close to the refrigerator door, especially if the sealing rubber is not in good conditions of insulation, as in this case the temperature in the place may increase due to the thermal exchange that will occur with the external environment. Both cases can mask the actual internal temperature of the refrigerator.
When disconnecting the electrical wires from the compressor to the refrigerator (Figure 7), it is necessary to leave the location of the phase wire and neutral wire connections previously identified in order to connect them properly later, but the reconnection will occur with the wires coming from the temperature controller that will control the refrigerator compressor.

Connection of the refrigerator and compressor cables where it was interrupted to change the compressor command to the temperature controller; (A) wires that conduct the energy to the compressor. (B) wires from the refrigerator’s internal equipment; (C) phase and neutral wires that feed the temperature controller.
In Figure 7, it is possible to see the original power cables (cable harnesses) of the refrigerator. The first highlight on the left of the image is the power cord that will be plugged into the outlet; it contains the following outputs: phase represented, in this case, by the brown color (Figure 7A) (care must be taken with these peculiarities, as the NBR 5410 standard of 2010 establishes that for electrical outputs PHASE must be identified by the red or black color), neutral in the blue color and ground in the green color. These divergences in colors can occur if the refrigerator is old, that is, you can find all the wires in the same color or in different colors than what is provided for in the standard. When in doubt, consult the refrigerator and / or manufacturer’s manual and do the test to be sure of the conductivity of each wire of the power cable.
To do the test, when the refrigerator is disconnected from the mains, the multimeter can be used, so it is possible to identify the wires of the power cables. To do this, you must connect the multimeter’s selector switch in continuity test and the test probes at the ends of all cables. With this, it will be possible to be sure which cable is phase, neutral or ground, because if the probes are connected, the multimeter will respond through a light or an audible signal.
The wires in Figure 7B must be insulated and will not be used, as these cables are intended to control the refrigerator, which will now be controlled by the temperature controller installed in this process. The phase return that leaves terminal 15 (Figure 4) of the temperature controller must be connected to the phase input of the refrigerator compressor as shown in Figure 8. Of the power cable wires, only the phase goes to the temperature controller to activate the compressor (Figures 4, 5 and 8). The phase and neutral power wires of the temperature controller also energize the refrigerator’s internal equipment, such as the refrigerator’s light and defrost fan (Figure 7B).

Phase wire (coming from the temperature controller) in black, neutral wire in red and ground wire from the power cable to the compressor in green.
The fourth step is to configure the temperature controller for the desired function. In the manual of the temperature controller Full Gauge MT-512E 2HP there are several configurations for different functionalities. In this work, the programming described in item five, page one of the manual was carried out, which refers to the maintenance of the desired temperature.
Initially, the Setpoint must be set (target temperature that is desired). For this, it will be necessary to keep pressing the button with the indication Set until the temperature appears on the screen. With that being done, the target temperature that you want to keep the refrigerator at will be adjusted with the side buttons; in the case of this statice vernalization work, the temperature to be kept inside was 10 °C. Once the temperature is set, it is necessary to press the Set button again to confirm the chosen temperature and the controller to store it in memory. With this, the temperature controller will show on the screen the internal temperature of the refrigerator and, if it is not 10 °C, the refrigerator compressor will be activated to work in order to reach the selected temperature. Doubts can be resolved in the manual of the Full Gauge MT-512E 2HP temperature controller in item 8 Setpoint and parameter settings.
Even with the installation of a temperature controller, inside the refrigerator there will be a small variation in the internal temperature. Therefore, there is the option to configure the Hysteresis, which is the tool that will be adjusted to determine the range of oscillation of the internal temperature of the refrigerator. Having defined the internal temperature of the refrigerator (10 °C) in the Setpoint, it is necessary to define the hysteresis, that is, as for the internal temperature it will vary around the desired temperature (10 °C). When the internal temperature of the refrigerator reaches 9 °C, the command given to the refrigerator air compressor is that it is already possible to stop the operation, as there is already a temperature close to the target; the opposite is also valid, that is, when the refrigerator’s internal temperature reaches 11 °C, the command given to the refrigerator’s air compressor is that it needs to be activated in order to decrease the internal temperature to the desired temperature (10 °C).
To configure the Hysteresis, press the Flatec button until the Func function is found. To select Func, it is necessary to press the Set button. With this command it is possible to access all the functions of the temperature controller; however, in order to enable and handle them, it is necessary to enter the code 123 described in the manual of the temperature controller (check the code of the controller model that will be used). Once this is done, all settings and functions of the temperature controller will be enabled. Follow in the settings until the function F06.
After finding F06, it is necessary to press Set to select the Hysteresis of interest (if there is no pattern, you can choose any value for this variation), and again press Set to complete the Hysteresis configuration. From this moment on, the controller will automatically control the refrigerator’s internal temperature range that has been selected. In the manual of the temperature controller Full Gauge MT-512E 2HP in item 8.4.2, there is a table of parameters where it is possible to check more functions of the temperature controller. The temperature sensor was installed as close as possible to the center of the refrigerator. It is not recommended that it be placed near the air vents, at the top or bottom of the refrigerator.
Installation of the lighting system
In order to maintain seedlings inside the refrigerator, it is necessary to have light for the process of photosynthesis. Therefore, it is essential to have uninterrupted light for a certain period. In the case of statice, which is a plant responsive to the long-day photoperiod (above 13 h) for flowering (Semeniuk and Krizek, 1972SEMENIUK, P.; KRIZEK, D.T. Influence of germination and growing temperature on flowering of six cultivars of annual statice (Limonium cv.). J. Amer. American Society for Horticultural Science, v.98, s/n, p.140-142, 1973.; Shillo and Zamski, 1985SHILLO, R.; ZAMSKI, E. Limonium sinuatum, In: Halevy, A.H. (ed.). CRC hand book of flowering. Boca Raton: CRCPress, 1985. p.293-301.; Chen et al., 2010CHEN, J.; FUNNELL, K.A.; MORGAN, E.R. A model for scheduling flowering of a Limonium sinuatum× Limonium perezii hybrid. HortScience, v.45, n.10, p.1441-1446, 2010. https://doi.org/10.21273/HORTSCI.45.10.1441
https://doi.org/10.21273/HORTSCI.45.10.1...
), during the seedling phase, it is necessary to keep the seedlings in a non-inductive photoperiod, that is, 10 hours of uninterrupted light inside the refrigerator.
In order to have a 10-hour daylight simulation, pieces of 5050 LED strips, white, 12V source, were placed inside the refrigerator. These strips must have a silicone finish for the sealing, as the humidity inside the refrigerator can damage the material. For a domestic refrigerator, the use of a 5-m-long LED strip was sufficient for a good light arrangement. The photosynthetic photon flux density (PPFD) inside the refrigerator ranged from 1.5 to 4.5 µmols m-2 s-1.
For better conditioning and more homogeneous light distribution, the LED strip was cut into several pieces, so the entire refrigerator was covered with light (Figure 9A). When distributing the lights, it should be kept in mind that the placement of the shelves and seedling trays will cause shading, so it is necessary to analyze the place where the LED strips will be placed so that, even with the light on inside, the refrigerator does not get dark for the seedlings due to the overlapping of the trays and shelves with respect to the allocation of the lights. The more segmentation is carried out on the LED strips, the greater the number of solders required to join the strips with the electrical cabling so that all the lights can turn on.

Installation of LED strips spaced inside the refrigerator. Highlighted in the image is the external / internal access to the installation of the LED strips (A). Digital timer used to turn the LED lights on and off inside the refrigerator (B). Statice seedlings with approximately five true leaves, when they were placed into the BOD prototype (C). LED strips: (D) a segment of the LED strip; (E) soldering point with adhesive tape finish.
In the external part of the access, the LED strip has an adapter to connect with the source that is in the digital timer, whose installation will be explained later. This initial part of the LED strips can be cut, but the cuts for segmenting the strips must always be made at the cutlines indicated on the strip itself (Figure 9A). Normally, these cutlines are visible, as there is a copper part (which runs along the entire length of the LED strip for conducting energy) that identifies them, which will receive the tin solder. For this tin solder it is necessary to use a soldering iron, which, after being turned on, through heating, will promote the formation of a drop (melting) of the tin. The tin must be deposited on the copper part of the LED strip and it will be joined (soldered) with the adapter wire connected to the source. This procedure must be fast and accurate. For the strips to be well adhered to the internal walls of the refrigerator, they must be clean and dry, since the LED strips have, in their structure, a double-sided tape for adhesion.
Timer configuration
The Digital Timer (Figure 9B) is a timer that has a socket connection in its structure, that is, there is no need for any type of installation, just connect it to the electric power. The use of the digital timer has the function of turning the LED lights on and off in the time programmed for the desired photoperiod.
From the Timer configuration, it is defined when and how long the lights will remain on inside the refrigerator. These are also used in greenhouses and protected environments for triggering irrigation, so they are easily found in irrigation equipment, hardware and livestock stores. In general, they are reliable and safe, but care must be taken and sporadic checks should be made to ascertain whether they are functioning correctly. In case of malfunctioning, there will be problems in the development of seedlings, as the seedlings submitted to vernalization already have true leaves (Figure 9C) and these need light energy to maintain the photosynthesis process even in a low-temperature environment. Without the light supply, the seedlings will suffer from a physiological disorder known as etiolation.
To program it, it is necessary to first set the Timer time and for that, the Clock buttons hour and minutes must be pressed simultaneously, adjusting the timer time. With that being done, when pressing the Timer button, the days of the week (English abbreviation) will appear at the top of the screen so that the days of the week on which the Timer should perform the desired function are chosen. In the case of this work, it was necessary to select every day of the week. Still in the timer configuration, on the left side of the interface, programming must be done.
For the vernalization of statice seedlings, there was only one daily schedule for a 10-hour photoperiod. Then, where the word On appears, the start time of the programming must be selected. After selecting the moment when the Timer will turn on the refrigerator lights, you must press the timer again. With the option Off, the moment when the LED lights will be turned off by the timer will be programmed. Once this is done, it is necessary to press the Timer button again to confirm the programming. After being successfully completed, the programming will take place every day that the Timer has been configured. All the materials used for the transformation of a common refrigerator into a BOD and their respective values in reais and dollars quoted for December 2019 are described in Table 1.
Materials needed for the adaptation of a domestic refrigerator with a capacity of 300 liters in a BOD and their respective quantities and values (based on the values found in the local market - Santa Maria/RS, December 2019).
Production of statice seedligns and vernalization
The statice seedlings that were tested in this experiment were produced and vernalized in the Horticulture sector at the main campus of the Federal University of Santa Maria - UFSM, in the period from December 2019 to January 2020.
The seedlings were produced from seeds of Limonium sinuatum L. cultivar QIS Yellow (germination: 88%; purity: 95%; origin: United States; category: S2) with yellow inflorescences, acquired from the company Ball Seeds®. The seeds were sown in polyethylene trays with 50 cells with dimensions of 5 cm x 5 cm and depth of 7.5 cm, filled with the commercial substrate for vegetables Turfa Fértil® (pH: 5.8; electrical conductivity (mS cm-1): 0.7; maximum moisture (% weight weight-1): 55; density on dry basis (kg m-3): 260; water holding capacity - WHC (%): 60; raw material: peat and carbonized rice husk, with addition of N (0.04%), P2O5 (0.04%), K2O (0.05%) and dolomitic limestone (1.5%). After sowing, the trays were irrigated and kept for three days in the dark for emergence to occur.
After the emergence of seedlings, they were arranged in a protected place (greenhouse with wooden structure and 150-micron plastic cover) until they had approximately five true leaves (Figure 9C). Then, the trays were placed inside the adapted refrigerator and remained for three weeks (01/06/2020 to 01/27/2020). The artificial vernalization occurred during three weeks, at a temperature of approximately 10 °C (with variation observed between 9.7 to 10.3 °C) and a 10-hour photoperiod (from 8 am to 6 pm). During this period of vernalization, the adapted refrigerator was only opened to irrigate the trays, when necessary, and to check the operation of the light inside it.
After the artificial vernalization period in the adapted refrigerator, the seedlings were placed in a cool, ventilated place, without direct exposure to the sun for acclimatization for 24 hours. Then, they were placed in a plastic greenhouse and remained there until the date of the transplant to complete the acclimatization. Seedling transplantation and cultivation was carried out on the properties of 5 producers (on farm) in five municipalities in Rio Grande do Sul (35 seedlings per producer): Cachoeira do Sul, Ivoti, Santa Maria, Rio Pardo and Vale Verde on 02/12/2020, 02/10/2020, 02/12/2020 02/17/2020 and 02/17/2020, respectively. The seedlings were transplanted in beds measuring 1 meter (m) wide, 8 m long and 20 cm (cm) high previously prepared and fertilized at a spacing of 30 cm between plants in the row and 50 cm between rows, with 2 parallel transplant rows arranged in each site. The fertilization used was mineral fertilization, applying the NPK 05-20-20 formulation at a dose of 25 grams per linear meter of bed and supplementation with 10 grams of urea per linear meter.
The five cultivation sites made it possible to grow statice under different edaphoclimatic conditions and respecting the management of each producer. To trail the efficiency of artificial vernalization, data on the beginning of flowering, number of harvests and number of flower stems produced per harvest and the total number of flower stems produced were collected on 10 plants at each location. In addition, the number of plants out of the 35 seedlings that flowered until Mother´s Day (05/10/2020) were counted. The control treatment (without vernalization) was a statice cultivation at the UFSM campus, with sowing on 12/14/2019 and transplantation on 1/14/2020. Harvest data were analyzed by calculating descriptive statics such as percentage of plants that flowered, number of harvests, and number of flower stems at each harvest date.
Results and Discussion
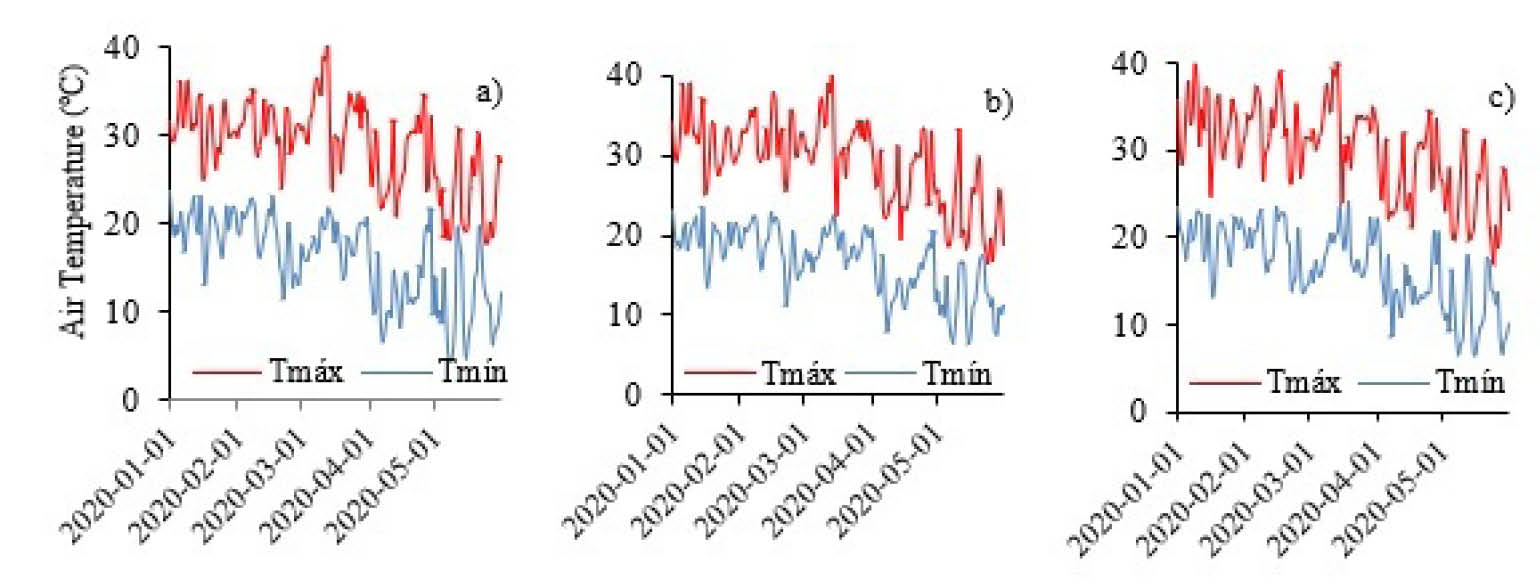
The total cost for adapting a domestic refrigerator to a BOD prototype was R$ 436.50 (U$$ 151.51 US dollars considering the exchange rate of December / 2020) (Table 1). Statice seedlings were transplanted to the field in summer (February), when temperatures are high (minimum daily temperature above 15 °C and maximum temperature above 25 °C, Figure 10) and the photoperiod is long (above 13h). These meteorological conditions are favorable to the flowering of artificially vernalized statice seedlings. For the 5 locations of the on-farm trail, the minimum air temperatures remained above 10 °C until early April, when the plants already had reproductive structures, indicating that the cold requirement was exclusively supplied by artificial vernalization in the adapted refrigerator.

Maximum and minimum air temperatures in the period from January to May 2020 for Santa Maria (a), Rio Pardo (b) and Campo Bom (c) in the State of Rio Grande do Sul, Brazil.
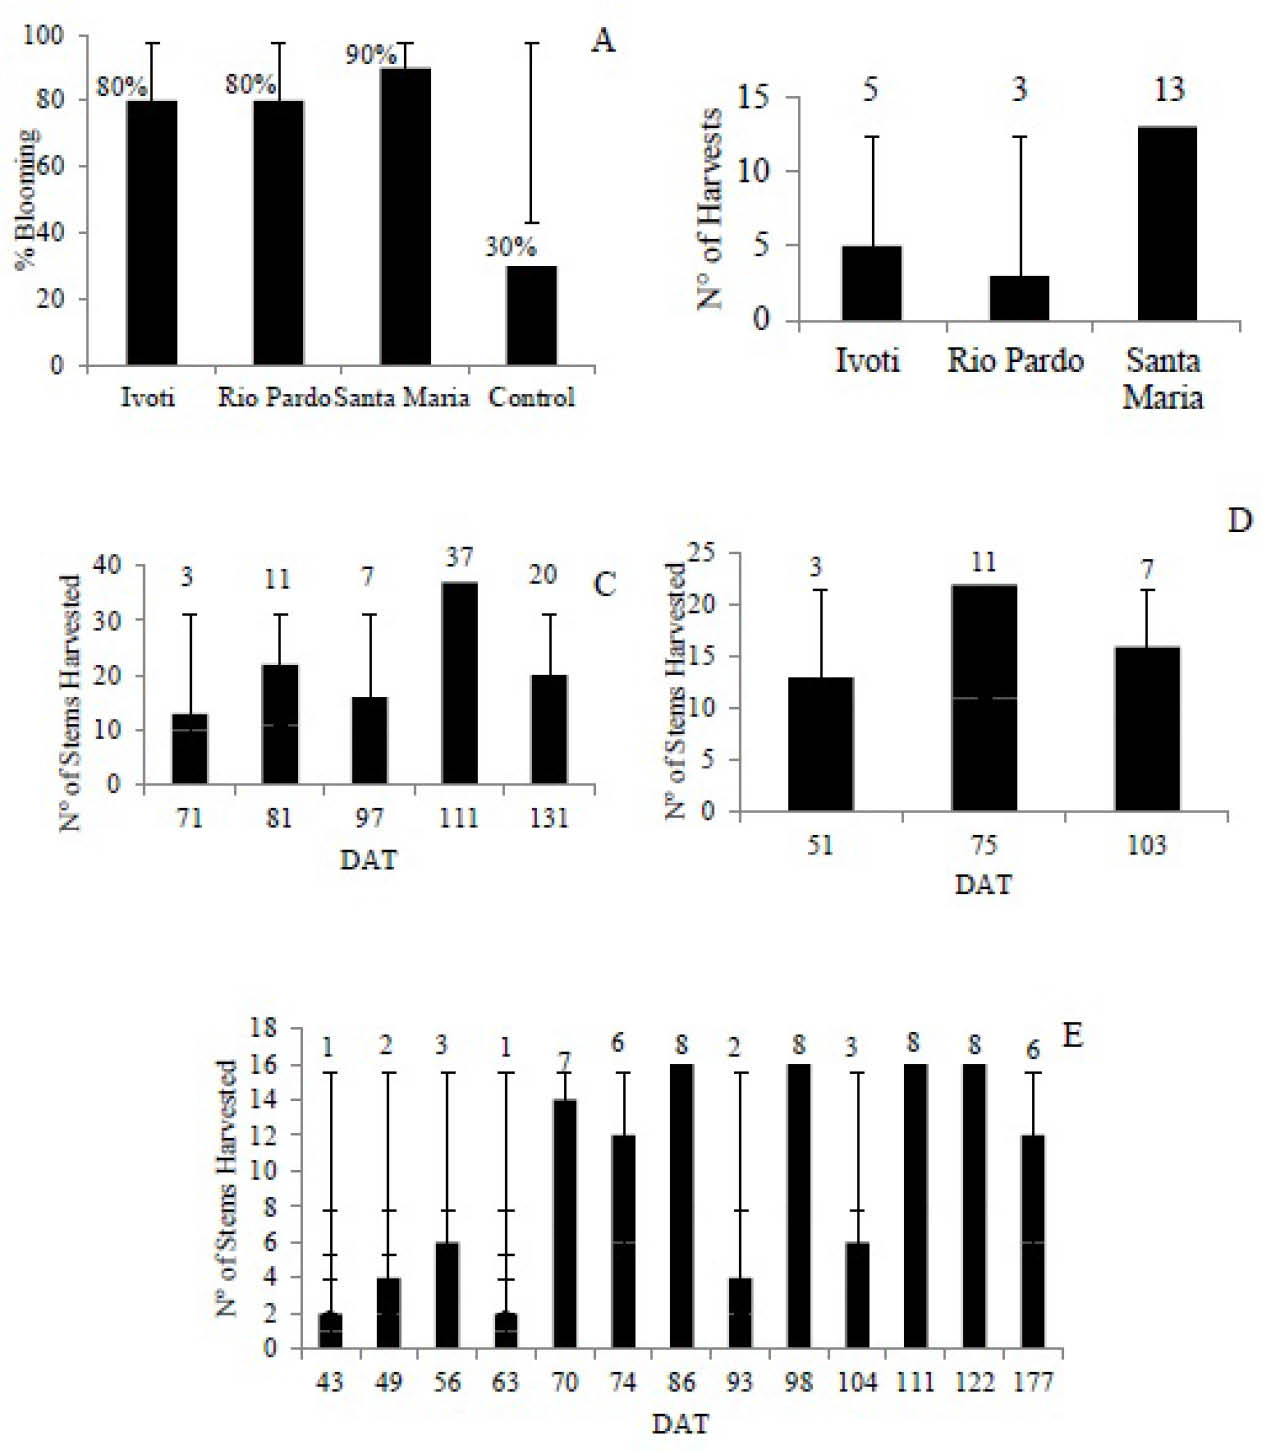
Figure 11A depicts the flowering of statice at three cultivation sites (Santa Maria, Rio Pardo and Ivoti). In Ivoti and Rio Pardo, 80% of the plants flowered and in Santa Maria the flowering reached 90%. In the control treatment, the plants were not submitted to vernalization (natural and artificial) and therefore did not present good floral development, that is, of all cultivated plants, only 30% managed to enter the reproductive phase.
In Cachoeira do Sul and Vale Verde, it was not possible to collect data due the pandemic COVID 19, but according to reports from the respective producers in these locations, the flowering was similar to those of Santa Maria, Rio Pardo and Ivoti. With that, it can be said that the plants submitted to artificial vernalization in the adapted refrigerator exceeded their requirement at low temperatures and managed to reach the reproductive phase.

Flowering percentage of artificially vernalized statice plants in three locations in Rio Grande do Sul: Ivoti, Rio Pardo and Santa Maria (A) and flowering percentage of the control treatment. Number of harvests of statice plants artificially vernalized at each cultivation site in Rio Grande do Sul (B). Total number of statice flower stems in 10 plants harvested in each harvest in (C) Ivoti, (D) Rio Pardo and (E) Santa Maria in Rio Grande do Sul in 2020.
There are few studies in the literature on statice crop, mainly regarding vernalization. Shillo (1976SHILLO, R. Control of flower initiation and development of statice (Limonium sinuatum) by temperature and daylength. Acta Horticulturae, v.64, s/n, p.197-204, 1976.) tested the artificial vernalization for the crop and obtained 100% flowering, results that corroborate those found in this experiment. With that, it becomes evident that the crop needs to be vernalized and that it is not costly to the producers.
The harvest started in late March in Santa Maria and by the week of Mother’s Day, all places had at least one harvest. Mother’s Day is an important date for flower consumption in Brazil and, as it is not possible to produce statice in the southern states of Brazil at the time of field cultivation, its production in the off-season has added value due to the time of great demand. In Ivoti and Rio Pardo, 5 and 3 harvests were carried out, respectively, while in Santa Maria there were 13 harvests (Figure 11B). In Santa Maria, the first harvest occurred on 03/26/2020 and the last one on 08/08/2020. In Ivoti, the first harvest occurred on 4/21/2020 and the last one on 6/22/2020 and in Rio Pardo the harvest started on 4/8/2020 and ended on 5/30/2020.
The number of harvests was different at each location. Where there were few harvests, more floral stems were harvested per harvest (Figure 11C, D) and where harvests were more frequent, fewer floral stems were harvested per harvest (Figure 11E). The decision to harvest more or less frequently was made by each producer according to their reality. Regarding the total number of stems harvested, in Ivoti there was a greater number of stems produced, totaling 78 stems, followed by Santa Maria with 63 stems and Rio Pardo, with 29 stems. Ivoti showed few harvests, but the harvests concentrated a greater number of stems, for example, the 4th harvest, totaling 37 stems. The opposite occurred in Santa Maria, where the number of harvests was higher and the number of stems per harvest was lower. In Santa Maria, the harvest period was longer, totaling 136 days of stem production. Due to the Covid 19 pandemic, it was not possible to visit the producers in Cachoeira do Sul and Vale Verde for training and, therefore, it was not possible to quantify the harvest.
When analyzing other cut flowers and ornamental plants, it is possible to notice similarity in some characteristics in these plants. Ciotta and Nunes. (2012CIOTTA, M.N.; NUNES, E.D.C. Rendimento, qualidade e longevidade de hastes de Photinia fraseri. Revista Brasileira de Horticultura Ornamental, v.18, n.2, p.141-146, 2012.), studying the productivity of Photinia fraseri, observed the production of 25 to 30 stems per plant considering the causes of this variation, climatic factors and growing season. For lily, Castro et al. (1979CASTRO, P.R.; MINAMI, K.; GIL, C.M.; DEMETRIO, C.G.B. Effects of vernalization and plant regulators on growth and flowering of Lilium longiflorum Thunb. Anais da Escola Superior de Agricultura Luiz de Queiroz, v.36, s/n, p.99-117, 1979.) studied the effects of vernalization on the crop and noticed that vernalization with a temperature below 8 °C led to reduction in the number of lily flower stems. Thus, the vernalizing temperature of 10 °C used in this experiment agrees with information found in the literature.
The difference in results obtained in Ivoti and Santa Maria, relative to the number of stems and number of harvests, can be explained by the ability of the crop to regrow (Blas, 1992BLAS, I.O. Morfología de Limonium sinuatum (L.) Miller (Plumbaginaceae). Revista de Biología Tropical, v.40, n.1, p.11-17, 1992.), that is, the appearance of side shoots is stimulated with each harvest. Plants grown in Ivoti died from freezing in July/2020 while in Santa Maria and Rio Pardo the plants did not die during winter, despite having been exposed to three frosts. In Santa Maria, the harvest occurred in June, when Valentine›s Day was a date of high consumption of flowers, and extended to Father›s Day, another date with potential for flower consumption. These results indicate that the production of statice in the off-season has the potential to offer this flower on important flower consumption dates in the first half of the year in Brazil.
At the statice on-farm cultivation assessment meeting in the five locations in RS, from the seedlings vernalized on 10/02/2020, producers and rural extension workers from Emater/RS-Ascar received the results of their cultivation, gave their testimony and they were able to learn from their colleagues in other places the experiences during cultivation (Equipe Phenoglad, 2020EQUIPE PHENOGLAD. Ensaio Estadual de Statice viabiliza produção fora de época. Santa Maria, 10 out. 2020. Available at: <Available at: http://www.cropmodels.ufsm.br/10/10/2020/ensaio-estadual-de-statice-viabiliza-producao-fora-de-epoca/ >. Accessed on: Jan 18, 2021.
http://www.cropmodels.ufsm.br/10/10/2020...
). Of the five producers who conducted the trail on their property, three (Cachoeira do Sul, Ivoti and Santa Maria) already produced statice during the normal harvest season in RS and had never produced statice outside this period. The satisfaction of having managed to produce statice out of season was their final message, to the point that two of them (Ivoti and Santa Maria) started the commercial production of approximately 1 thousand seedlings aiming to harvest for Mother›s Day 2021. The other two producers (Rio Pardo and Vale Verde) had never cultivated statice and reported their experience as excellent, having learned management practices and being able to start cultivation from learning. Emater/RS-Ascar rural extension workers reported their unprecedented experience with the statice crop in providing technical assistance, bringing technology and knowledge to producers.
Conclusions
Adapting a home refrigerator to a BOD prototype is possible, inexpensive and easy. For statice crop, this technique met the demand for vernalization, making it possible to produce this flower in the off-season of Rio Grande do Sul, allowing small producers to diversify their production, adding value, bringing innovation and increasing opportunities for the floriculture of this state.
The trial to test the vernalization of statice seedlings carried out on properties (on farm) allowed the participation of producers and rural extension workers in the cultivation and harvesting and with that the rural extension actively participated in the construction of the results, which were immediately disclosed among the participants.
Acknowledgments
The authors would like to thank the PhenoGlad Team and the rural extension workers of Emater/RS-Ascar for their support and the rural producers Diesser Mota (Cachoeira do Sul), Laerte Corrêa da Silva (Ivoti), Onira Santos Silva (Rio Pardo), Milton Cauzzo (Santa Maria) and Paulino Toiller (Vale Verde) for allowing the statice test to be conducted on their properties.
References
- ANDINI, U.R.; SETIADO, H.; SIREGAR, L.A.M. The Effect of vernalization on the appearance of local amaryllis (Hippeastrum sp.) plants in the Land of Karo and West Sumatera. Jurnal Pertanian Tropik, v.6, n.1, p.24-33, 2019. https://doi.org/10.32734/jpt.v6i1.3036
» https://doi.org/10.32734/jpt.v6i1.3036 - BLAS, I.O. Morfología de Limonium sinuatum (L.) Miller (Plumbaginaceae). Revista de Biología Tropical, v.40, n.1, p.11-17, 1992.
- BOUCHÉ, F.; WOODS, D.P.; AMASINO, R.M. Winter memory throughout the plant Kingdom: different paths to flowering. Plant Physiology, v.173, n.1, p.27-35, 2017. https://doi.org/10.1104/pp.16.013
» https://doi.org/10.1104/pp.16.013 - CASTRO, P.R.; MINAMI, K.; GIL, C.M.; DEMETRIO, C.G.B. Effects of vernalization and plant regulators on growth and flowering of Lilium longiflorum Thunb. Anais da Escola Superior de Agricultura Luiz de Queiroz, v.36, s/n, p.99-117, 1979.
- CHEN, J.; FUNNELL, K.A.; MORGAN, E.R. A model for scheduling flowering of a Limonium sinuatum× Limonium perezii hybrid. HortScience, v.45, n.10, p.1441-1446, 2010. https://doi.org/10.21273/HORTSCI.45.10.1441
» https://doi.org/10.21273/HORTSCI.45.10.1441 - CIOTTA, M.N.; NUNES, E.D.C. Rendimento, qualidade e longevidade de hastes de Photinia fraseri Revista Brasileira de Horticultura Ornamental, v.18, n.2, p.141-146, 2012.
- D’ANGELO, C.J.; GOLDMAN, I.L. Temporal aspects of vernalization and flowering in long-day storage onion. Journal of the American Society for Horticultural Science, v.143, n.6, p.446-453, 2018. https://doi.org/10.21273/JASHS04495-18
» https://doi.org/10.21273/JASHS04495-18 - DIEL, M.I.; PINHEIRO, M.V.M.; COCCO, C.; THIESEN, L.A.; ALTÍSSIMO, B.S.; FONTANA, D.C.; CARON, B.O.; TESTA, V.; SCHMIDT, D. Artificial vernalization in strawberry plants: Phyllochron, production and quality. Australian Journal of Crop Science, v.11, n.10, p.135-1319, 2017.
- EQUIPE PHENOGLAD. Ensaio Estadual de Statice viabiliza produção fora de época. Santa Maria, 10 out. 2020. Available at: <Available at: http://www.cropmodels.ufsm.br/10/10/2020/ensaio-estadual-de-statice-viabiliza-producao-fora-de-epoca/ >. Accessed on: Jan 18, 2021.
» http://www.cropmodels.ufsm.br/10/10/2020/ensaio-estadual-de-statice-viabiliza-producao-fora-de-epoca/ - GREZ, J.; CONTRERAS, E.; SÁNCHEZ, S.; ALCALDE, J.A.; GAMBARDELLA, M. Floral induction and dormancy behaviour in ‘Chilean white strawberry’ (Fragaria chiloensis (L.) Mill. subsp. chiloensis f. chiloensis). Scientia Horticulturae, v.274, p.1-6, 2020. https://doi.org/10.1016/j.scienta.2020.109648
» https://doi.org/10.1016/j.scienta.2020.109648 - LI, W.; LIU, X.; LU, Y. Transcriptome comparison reveals key candidate genes in response to vernalization of Oriental lily. BMC genomics, v.17, n.1, p.21, 2016. https://doi.org/10.1186/s12864-016-2955-0
» https://doi.org/10.1186/s12864-016-2955-0 - MANUAL MT - 512E 2HP. Controlador de temperatura Versão 13. Canoas: Full Gauge, 2016.
- PARRY, M.L. Climate change and world agriculture. Parmesan: Routledge, 2019.
- SEMENIUK, P.; KRIZEK, D.T. Influence of germination and growing temperature on flowering of six cultivars of annual statice (Limonium cv.). J. Amer. American Society for Horticultural Science, v.98, s/n, p.140-142, 1973.
- SHILLO, R. Control of flower initiation and development of statice (Limonium sinuatum) by temperature and daylength. Acta Horticulturae, v.64, s/n, p.197-204, 1976.
- SHILLO, R.; ZAMSKI, E. Limonium sinuatum, In: Halevy, A.H. (ed.). CRC hand book of flowering. Boca Raton: CRCPress, 1985. p.293-301.
- SHOURBALAL, S.K.S.; SOLEYMANI, A.; JAVANMARD, H.R. Shortening vernalization in winter wheat (Triticum aestivumL.) using plant growth regulators and cold stratification. Journal of Cleaner Production, v.219, s/n, p.443-450, 2019. https://doi.org/10.1016/j.jclepro.2019.02.030
» https://doi.org/10.1016/j.jclepro.2019.02.030 - TAIZ, L; ZEIGER, E. Fisiologia e Desenvolvimento Vegetal. 6ed. Porto Alegre: Editora ARTMED, 2017. 952p.
- TOMIOZZO, R.; UHLMANN, L.O.; BECKER, C.C.; SCHWAB, N.T.; STRECK, N.A.; BALEST, D.S. How to produce gladiolus corms? Ornamental Horticulture, v.25, n.3, p.299-306, 2019. https://doi.org/10.1590/2447-536x.v25i3.2048
» https://doi.org/10.1590/2447-536x.v25i3.2048 - WU, C.; WANG, M.; DONG, Y.; CHENG, Z.; MENG, H. Effect of plant age and vernalization on bolting, plant growth and enzyme activity of garlic (Allium sativum L.). Scientia Horticulturae , v.201, p.295-305, 2016. https://doi.org/10.1016/j.scienta.2016.02.006
» https://doi.org/10.1016/j.scienta.2016.02.006
-
Area Editor: Gilmar Schafer
Author Contribution
-
PAB: design of the study, data collection, data analysis and interpretation, writing and critical review of the article. NTS: study supervisor, writing and critical review of the article and approval of the final version of the study. NAS: study supervisor, approval of the final version of the study. LOU: analysis and interpretation of data. EFL: collection, analysis and interpretation of data and critical review of the article. PM: data collection, analysis and interpretation.
Publication Dates
-
Publication in this collection
08 Nov 2021 -
Date of issue
Oct-Dec 2021
History
-
Received
25 May 2021 -
Accepted
24 Aug 2021 -
Published
17 Sept 2021