 Minimally invasive technique for coxofemoral luxation treatment in dogs: a cadaveric study
ABSTRACT:
Hip luxation is the most common injury among traumatic dislocations in dogs, and its closed reduction has a high chance of recurrence. Conventional surgical treatments present risks of important complications, which can be reduced with the use of minimally invasive techniques. Such techniques can be radiographically guided, and radiographic examination is widely available in clinical routine. This study developed a minimally invasive technique for stabilization of coxofemoral luxation, guided by radiographic images, in dog cadavers, being, to the authors’ knowledge, its first description in literature. The procedure started by defining positionings of the limb, aiming to guide the introduction of the guide pin (GP) and planning the technique. Thereafter, the GP was percutaneously introduced into the greater trochanter of the femur, until it crossed the acetabular far cortical. After its implantation, a cannulated drill (CD) was inserted, and drilled until it crossed the acetabular far cortical. The GP was removed, and a toggle pin was introduced and accommodated in the acetabular far cortical. The technique was performed on fourteen hip joints. The location of the perforations and complications of the technique were evaluated. The most observed complication was the mild deviation in drilling, representing 28.6%. The objective was fully achieved in eight joints (57.1%), where the exit points of the perforations were in the insertion of the round ligament. We concluded that the technique can be performed in cadavers, but further studies are needed to improve the accuracy and safety of the procedure.
Key words:
cannulated drill; hip dislocation; ex vivo study; toggle pin; X-ray
RESUMO:
A luxação coxofemoral é a lesão mais comum entre as luxações traumáticas em cães, e sua redução fechada possui grande chance de recidiva. Já os tratamentos cirúrgicos convencionais apresentam riscos de complicações importantes, que podem ser reduzidos com o uso de técnicas minimamente invasivas. Tais técnicas podem ser guiadas radiograficamente, sendo o exame radiográfico amplamente disponível na rotina clínica. O objetivo do presente estudo foi desenvolver uma técnica minimamente invasiva para estabilização da luxação coxofemoral, guiada por imagens radiográficas, em cadáveres de cães, sendo, pelo conhecimento dos autores, sua primeira descrição em literatura. O procedimento iniciou pela definição dos posicionamentos do membro, objetivando guiar a introdução do pino guia (PG) e planejando a técnica. Posteriormente, o PG foi introduzido, de forma percutânea, no trocânter maior do fêmur, até atravessar a cortical trans acetabular. Após a sua implantação, uma broca canulada (BC) foi inserida, até atravessar a cortical trans acetabular. O PG foi removido e introduziu-se e acomodou-se a cavilha na cortical trans acetabular. Realizou-se a técnica em quatorze quadris. O local das perfurações e complicações da técnica foram avaliados. A complicação mais observada foi o desvio leve na perfuração, representando 28,6%. O objetivo foi plenamente alcançado em oito quadris (57,1%), em que o ponto de saída das perfurações localizou-se exatamente na inserção do ligamento redondo. Concluiu-se que a técnica pode ser realizada em cadáveres, porém novos estudos são necessários para aumentar a acurácia e segurança do procedimento.
Palavras-chave:
broca canulada; luxação de quadril; estudo ex vivo; cavilha; raio-X
INTRODUCTION
Traumatic coxofemoral luxation is an injury commonly observed in small animal practice and may account for up to 90.0% of dislocations in dogs (KENDIG et al., 2020). Closed reduction of coxofemoral luxations presents up to 65.0% failure rate (PIERMATTEI et al., 2009). Surgical reduction may be obtained using intra-articular techniques (transposition of the sacrotuberous ligament, substitution of the round ligament by preserved fascia lata implant, transarticular pin, and toggle pin) (ÖZAYDIN et al., 2003; SIA et al., 2009; MCCARTNEY & MCGOVERN, 2016; TROSTEL & DEREK, 2020; HYBKI et al., 2022) or extra-articular techniques (capsulorrhaphy and suture stabilization) (MARTINI et al., 2001; PIERMATTEI et al., 2009).
Conventional open reduction may be associated with great impairment of tissues adjacent to the coxofemoral joint, infection of surgical site and seroma (MARTINI et al., 2001; DEMKO et al., 2006; MCCARTNEY & MCGOVERN, 2016). Minimally invasive approach aims to reduce the iatrogenic soft tissue trauma, risk of infection and intra-operative contamination, and devitalization of the periosteal blood supply (HUDSON et al., 2009; MAYHEW et al., 2012). HEO & LEE (2013), HELMICK et al. (2018), ROCHELEAU (2018), SEGAL et al. (2018), and RUPÉREZ et al. (2023) described minimally invasive techniques using arthroscopic and/or fluoroscopic guidance, for toggle pin implantation, promoting coxofemoral stabilization.
Arthroscopy and fluoroscopy are excellent diagnostic and treatment tools but have a high acquisition cost and are restricted to hospitals and large veterinary centers. In contrast, the X-ray equipment is present in most veterinary clinics and hospitals and is very useful because it is a non-invasive and fast-performing test (PIERMATTEI et al., 2009). From this perspective, it is necessary to study techniques using tools that are widely available in clinical routine, such as X-ray equipment, so that more surgeons can apply such techniques and more animals benefit from minimally invasive treatments.
This ex vivo study developed a minimally invasive technique, guided by radiographic images, for coxofemoral luxation stabilization, evaluating its execution time, required number of radiographic images and analyze the accuracy of the perforations in the coxofemoral joint. We hypothesized that it is possible to perform a minimally invasive technique for correction of coxofemoral luxation using toggle pin, guided by radiographic images, without the need for fluoroscopy and/or arthroscopy.
MATERIALS AND METHODS
Fourteen hip joints from seven dogs weighing between 20 and 30 kg, which died or were euthanized for reasons unrelated to this study. The specimens were kept at -20 ºC and thawed at room temperature just prior to testing. Cadavers that presented radiographic alterations in the coxofemoral joint were excluded. All procedures were performed by the same veterinary surgeon.
Induction of coxofemoral luxation
Initially, a craniodorsal approach was performed to the hip joint and the dislocation was induced by opening the joint capsule and disrupting the round ligament. After confirmation of coxofemoral luxation, the soft tissues were sutured. The urinary bladder was emptied using a urethral catheter to mimic a routine surgical condition.
Positioning
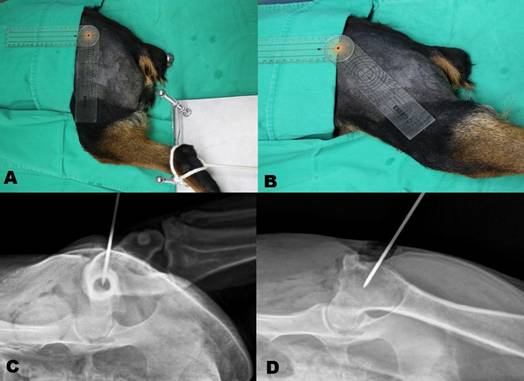
The specimens were positioned in lateral recumbency, to allow the insertion of the guide pin (GP) through the lateral face of the greater trochanter of the femur, enabling to evaluate the angulation, insertion depth and centralization of the GP in the bone. Two radiograph positioning were performed for this evaluation: In Positioning 1 (P1), the hip to be operated was positioned upwards, with the animal in lateral recumbency and pelvic limbs pulled towards the X-ray emitter and the back towards the wall bucky (Figure 1). The limb was positioned at an angle of 90º to the spine, measured by a goniometer. The femur was kept parallel to the horizontal axis of the table and aligned with the collimator of the X-ray device, allowing obtaining an axial radiographic image projection, from distal to proximal of the femur (Figure 2A and Figure 2C). In Positioning 2 (P2), the hip joint extension was performed, with a range of 130º to 140º in relation to the spine, measured by a goniometer. The X-ray collimator was kept in the same position as P1 (Figure 2B and Figure 2D).

Photographic image of a canine cadaver, positioned in right lateral recumbency, with the hip to be operated upwards, and the limb positioned at an angle of 90º to the spine. Note the presence of a spherical marker with a diameter of one inch (2.54 cm) placed on the skin close to the acetabular area (between the ischial tuberosity and the greater trochanter of the femur) (black arrow). Wall Bucky (white arrow) positioned dorsally to the cadaver.

Photographic and radiographic images of the pelvic limb of a canine cadaver. The femur was kept at an angle of 90º to the spine, parallel to the horizontal axis of the table and aligned with the collimator of the X-ray device, allowing obtaining an axial radiographic projection, from distal to proximal of the femur (A, C), representing Positioning 1 (P1). In Positioning 2 (P2), the hip joint extension was performed, with a range of 130º to 140º in relation to the spine, and the X-ray collimator was kept in the same position as P1 (B, D). Note the presence of the goniometer in photographic images A and B, and the presence of the guide pin inserted into the lateral surface of the greater trochanter of the femur in radiographic images C and D.
Bone drilling calculation
While performing the radiographic images to obtain P1, a spherical marker with a diameter of one inch (2.54 cm) was positioned on the skin close to the acetabular area (between the ischial tuberosity and the greater trochanter of the femur) (Figure 1). After radiographic processing, the diameter of the projected sphere was measured using the X-ray equipment software (Multix B 500/125, Siemens). The image magnification was calculated using the formula [(projected diameter / true diameter) X 100] (BOESE et al., 2015). With this result, the depth of the perforations was calculated, and safety markers were added both in the cannulated drill (CD) and in the GP. The animal’s limb was maintained in P1 and P2 by supports, without the need for direct human participation during the X-ray examination.
Procedure technique
Once P1 was defined (Figure 3A and Figure 3B), the hip structures were palpated, and the greater trochanter of the femur was located. Based on previous radiographic images, positioning and inclination of the lateral surface of the greater trochanter, a small incision of approximately 1.0 cm was made, encompassing the skin, subcutaneous tissue, and muscle tissue, until reaching the lateral surface of the greater trochanter of the femur.

Radiographic images demonstrating the procedure of the Minimally invasive technique for coxofemoral luxation treatment in dogs: A cadaveric study. The surgical procedure was divided into six moments. Moment 1 (M1) refers to the positioning of the limb, which includes the time interval between the first radiographic image and obtaining Positioning 1 (P1) (A, B). Moment 2 (M2) is the guide pin (GP) positioning, which represents the time interval between the first radiographic image with the GP until the adequate positioning of the GP was obtained in the near cortical of the lateral surface of the greater trochanter of the femur (B, C, D, E, F). Moment 3 (M3) refers to the introduction of the GP up to the acetabular far cortical, and comprises the time interval between M2, until the GP crosses the acetabular far cortical (F, G). Moment 4 (M4) is the introduction of the cannulated drill (CD) up to the acetabular far cortical and included the time interval between M3 until the CD reaches the desired depth (G, H). Moment 5 (M5) is the implantation of the toggle pin, which represents the time interval between M4 and the end of the implantation of the toggle pin and its button (H, I).
The 2.2 mm diameter GP was positioned in the incision and, using an orthopedic drill, it was introduced crossing only the trochanter near cortical. At that moment, the positioning was checked on the radiographic image. When adjustments were necessary, new radiographic images were made until the desired position was reached (Figure 3C and Figure 3D).
After positioning the GP defined in P1, its angle was checked in relation to the inclination angle of the neck and femoral head, placing the limb in P2. This change in position allowed visualization of the femoral neck on the radiographic image, enabling to project the path of the GP. If the positioning was adequate, the limb was returned to P1. If the GP was not in the correct positioning, adjustments were made, and new radiographic images were obtained (Figure 3E and Figure 3F).
Once the positioning and angulation of the GP had been defined, and the magnification calculations accomplished, the GP was slowly introduced until the acetabular far cortical was reached. The depth was monitored using new radiographic images (Figure 3G).
After confirming, with radiographic images, the perforation of the acetabular far cortical by the GP, the CD was inserted, conducted by the GP, and the bone was drilled from the greater trochanter of the femur to the acetabular far cortical (Figure 3H). The CD measured 4.5 mm in external diameter, 2.4 mm in internal hole and 230.0 mm in length (Figure 4C). Additionally, markers were used to limit hole depth, based on previously performed magnification calculations. The executor could request radiographic images during the insertion of the CD, whenever necessary.

Photographic images of devices used in the Minimally invasive technique for coxofemoral luxation treatment in dogs: A cadaveric study. Metallic button, in which the sutures were anchored, and which was fixed to the lateral surface of the greater trochanter of the femur (A). The exit of the toggle pin from the cannulated drill (B). Metallic pin with a blunt tip (yellow arrow), used to remove possible obstructions of the cannula; cannulated drill (white arrow), used to drill and conduct the toggle pin into the acetabular far cortical; and guide pin (black arrow), used to guide the perforation of the cannulated drill (C).
After the CD crossed the acetabular far cortical, the GP was removed and a 2.2 mm metallic pin, with a blunt tip, was inserted inside the CD, to remove any possible obstruction of the cannula that could hinder the insertion of the toggle pin (Figure 4C).
The toggle pin (which measured 10.0 mm in length and 2.0 mm in diameter) had a central hole through which a suture was passed (1-poliglecaprone-25, just to simulate the technique) (Figure 4B). The toggle pin and suture were inserted into the CD through an introducer and were accommodated on the medial surface of the acetabular far cortical (Figure 3I, Figure 4A and Figure 4D).
After passage and proper positioning of the toggle pin, the CD was removed and a metallic button (Figure 4A), with holes through which the two ends of the suture had been passed, was fixed on the lateral surface of the greater trochanter of the femur (Figure 5E). Radiographic images were performed to visualize the positioning of the implants and determine the end of the procedure, in P1 and P2 (Figure 5F).

Radiographic images demonstrating the procedure of the Minimally invasive technique for coxofemoral luxation treatment in dogs: A cadaveric study. The surgical procedure was divided into six moments. Moment 5 (M5) is the implantation of the toggle pin, which represents the time interval between M4 and the end of the implantation of the toggle pin and its button (A, B, C, D, E). Moment 6 (M6) is the procedure control radiographic images and comprises the time interval between M5 and the last control image, in P1 and Positioning 2 (P2) (E, F).
Procedure moments
The surgical procedure was divided into six moments and the duration of each one of them was measured with a digital chronometer. The total number of radiographic images of each case was recorded and listed according to each moment. Each moment of the procedure is described below.
Moment 1 (M1) refers to the positioning of the limb, which includes the time interval between the first radiographic image and obtaining P1 (Figure 3A and Figure 3B). Moment 2 (M2) is the GP positioning, which represents the time interval between the first radiographic image with the GP until the adequate positioning of the GP was obtained in the near cortical of the lateral surface of the greater trochanter of the femur (Figure 3B and Figure 3F). Moment 3 (M3) refers to the introduction of the GP up to the acetabular far cortical, and comprises the time interval between M2, until the GP crosses the acetabular far cortical (Figure 3F and Figure 3G). Moment 4 (M4) is the introduction of the CD up to the acetabular far cortical and included the time interval between M3 until the CD reaches the desired depth (Figure 3G and Figure 3H). Moment 5 (M5) is the implantation of the toggle pin, which represents the time interval between M4 and the end of the implantation of the toggle pin and its button (Figure 3H and Figure 3I, Figure 5A and Figure 5E). Finally, moment 6 (M6) is the procedure control radiographic images and comprises the time interval between M5 and the last control image, in P1 and P2 (Figure 5E and Figure 5F).
Post-procedure evaluation
After the end of the procedure, the pelvic canal and the coxofemoral joint were opened and examined looking for possible iatrogenic injuries, and to identify the perforation site in the femoral head and acetabulum, which was classified as described below.
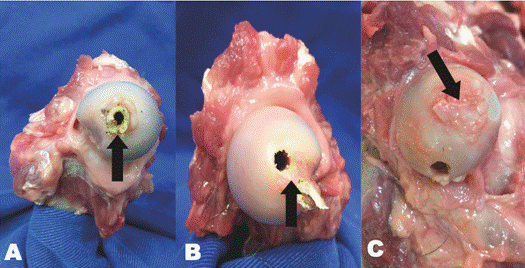
Drilling with no deviation was considered when the exit point of perforation reached the fovea and the insertion of the round ligament in the acetabulum. A mild deviation was considered when the exit point of perforation contacted the fovea and/or the insertion of the round ligament into the acetabulum but presented a deviation. A severe deviation was considered when the exit point of perforation was distant or not in contact with the fovea and/or the insertion of the round ligament into the acetabulum.
Complications
Complications were classified as irreversible and reversible. Irreversible complications were those that could not be resolved and caused damage to the result of the technique, such as deviations (mild or severe) at the site of perforations and/or excessive introduction of the GP, when it exceeded more than 2.0 cm from the acetabular far cortical. Reversible complications were events that could be corrected without compromising the technique, such as incomplete passage of the toggle pin and the need to initially reintroduce the GP.
Statistical analysis
The data were tabulated and analyzed in a descriptive way using a software program (Excel v.2016, Microsoft Company, USA). The relative frequencies were calculated for categorical variables. The Shapiro-Wilk test was used to evaluate data for normal distribution, using a software program (GraphPad Prism v.9.5.1 for Windows, USA). Median and interquartile range (IR) were used to describe quantitative variables with asymmetrical distribution.
RESULTS
Number of radiographic images
The median (IR), minimum and maximum number of radiographic images per procedure is described in table 1. Considering all the radiographic images, M1 (Limb positioning) accounted for 12.5%, M2 (GP positioning) for 29.6%, M3 (Introduction of the GP up to the acetabular far cortical) for 19.9%, M4 (Introduction of the CD up to the acetabular far cortical) for 9.3%, M5 (Implantation of the toggle pin) for 12.5%, and M6 (Procedure control radiographic images) for 16.2%
Minimum, maximum, and median time of procedure, in minutes (min), and minimum, maximum and median number of radiographic images of the Minimally invasive technique for coxofemoral luxation treatment in dogs: A cadaveric study.
Procedure execution time
The median (IR), minimum and maximum times for each moment of the procedure are described in table 1. Considering each moment of the procedure, M1 (Limb positioning) represented 11.1%, M2 (GP positioning) 30.4%, M3 (Introduction of the GP up to the acetabular far cortical) 22.5%, M4 (Introduction of the CD up to the acetabular far cortical) 13.9%, M5 (Implantation of the toggle pin) 14.1%, and M6 (Procedure control radiographic images) 8.1%.
Number of radiographic images versus Procedure execution time
The figure 6 shows the median execution time and the median number of radiographic images for each moment of the procedure. In M1, it was noted greater difficulty in performing the P1 in one case, as it had a deformity in the distal femoral region. The other limbs were positioned without major complications. The median times of M2 and M3 were longer than the others and presented a greater number of radiographic images performed.

Median number of radiographic images and median execution time for each moment of the Minimally invasive technique for coxofemoral luxation treatment in dogs: A cadaveric study.
Complications also influenced the increase in the number of radiographic images at each moment and; consequently, resulted in an increase in the execution time of the technique. In M5, the median time was longer than expected since there were three cases of obstruction of the canula of the CD. In two other cases, radiographic images confirming the position of the toggle pin were inconclusive, requiring a slight return of the CD to assess, through a new radiographic image, whether the toggle pin was properly positioned.
Complications and safety of the technique
The complications of the technique have been listed in table 2. Among the fourteen cases, two did not present complications, representing 14.3% of the joints used. Regarding the perforations, it was observed that in eight joints (57.1%) the objective was fully achieved, since the exit points of the perforations were in the topography of the fovea and insertion of the round ligament in the acetabulum (Figure 7A).
Irreversible and reversible complications of the Minimally invasive technique for coxofemoral luxation treatment in dogs: A cadaveric study.

Photographic images demonstrating perforations in femoral heads obtained through the Minimally invasive technique for coxofemoral luxation treatment in dogs: A cadaveric study. Drilling with no deviation, considered when the exit point of perforation reached the fovea and the insertion of the round ligament in the acetabulum (A). Mild deviation in drilling, considered when the exit point of perforation contacted the fovea and/or the insertion of the round ligament into the acetabulum but presented a deviation (B). Severe deviated in drilling, considered when the exit point of perforation was distant or not in contact with the fovea and/or the insertion of the round ligament into the acetabulum (C) (black arrows indicating the fovea).
Irreversible complications were observed in seven procedures: five cases of deviation in drilling alone (Figure 7B and Figure 7C), one case of excessive GP insertion alone, and one case with both complications (deviation in drilling and excessive GP insertion). In the latter case, the toggle pin was implanted inside the prostate of the cadaver. In one case, there was a mild deviation in drilling, which configured an irreversible complication, but, in association, a possible incomplete passage of the toggle pin was observed, classified as a reversible complication.
Reversible complications were present in half of the eight hips that had perforations without deviation. These complications were overcome by repositioning the GP and cleaning the canula of the CD, allowing the complete passage of the toggle pin. Reversible complications were observed in six cases (42.9%). Possible incomplete passage and incomplete passage of the toggle pin corresponded to five of these cases and reintroduction of GP to one case.
DISCUSSION
The current study developed a minimally invasive technique, guided by radiographic images, using toggle pin, for the treatment of coxofemoral luxation in canine cadavers and obtained a success rate of 57.1% in relation to perforation in the fovea topography and insertion of the round ligament. Minimally invasive approach has several advantages over open procedures, with less tissue manipulation, less dissection, maintenance of the integrity of the surrounding joint tissues, with a decrease in the risk of infection and avoiding injuries that cause pain or decrease the joint range of motion (MAYHEW, 2011; TROSTEL & DEREK, 2020; DARROW et al., 2021). Conventional surgical access may require deep gluteal tenotomy, trochanteric osteotomy and damage to the joint capsule, manipulations that can cause more pain and more sequelae than the hip instability itself (PIERMATTEI et al., 2009). Similar minimally invasive techniques, for toggle pin implantation aiming coxofemoral stabilization, were performed using arthroscopic and/or fluoroscopic guidance (HEO & LEE, 2013; HELMICK et al., 2018; ROCHELEAU, 2018; SEGAL et al., 2018; RUPÉREZ et al., 2023). Those devices are expensive and not available in most hospitals and veterinary clinics (PIERMATTEI et al., 2009). The present study applied the radiographic technique, as it is an easily accessible equipment that is fully integrated into the routine of small animal practice. To the best of the author’s knowledge, this is the first study with this purpose.
A single radiographic projection only has a two-dimensional representation, but the association of orthogonal images enables a three-dimensional representation (THRALL, 2018). For this reason, two different and orthogonal positions, P1 and P2, were extremely important for the planning and execution of the technique, allowing to project the path of the GP and its introduction depth.
Another advantage of the technique that uses radiographic images is that the surgical team is not directly exposed to the radiation emitted by most commercially available fluoroscopes (PIERMATTEI et al., 2009), since the presence of the surgical team is not necessary during the radiographic examination.
The total median time (36.7 min) to perform the procedure was lower than that obtained in a case report that used fluoroscopy and arthroscopy to guide the toggle pin placement (60 min) (ROCHELEAU, 2018). This result was not expected since fluoroscopy displays the image in real time and does not require the time interval between performing and revealing the radiographic images. This longer time can probably be explained using arthroscopy during ROCHELEAU (2018) procedure, which may have resulted in a significant increase in the total time of his technique. Another study evaluated the open surgical treatment of 62 cases of coxofemoral luxation in dogs, and just for five animals (8.0%) the procedure time was less than one hour (DEMKO et al., 2006). This longer time can be justified by the surgical access to the coxofemoral joint, since it is delicate and requires careful tissue dissection, which generates an increase in the execution time in open procedures. Furthermore, 50.0% of the animals that were enrolled in the mentioned study, presented injuries secondary to trauma, such as skin lesions and even fractures (DEMKO et al., 2006). Therefore, it is noteworthy that the total median time for executing the technique in the present study was considerably shorter compared to the other studies cited here. Nevertheless, caution should be taken in relation to comparisons between works involving live animals and cadavers, as the study on cadavers does not mimic some of the challenges seen in in vivo studies, such as bleeding and difficulty in reducing the dislocation.
Positioning 1 allowed an axial view of the femur, which was of great importance in the positioning of the GP, in relation to the anteversion angle of the femoral neck, inclination of the lateral surface of the greater trochanter and in the centralization of the GP in relation to the longitudinal axis of the femur (Figure 2C). DUDLEY et al. (2006) compared the use of radiographic images with the same positioning of P1 and computed tomography, to evaluate the anatomical particularities of the proximal femur, and concluded that both presented accurate results for this evaluation. Positioning 2, conversely, indicated whether the angulation of the GP was compatible with the angulation of the neck and femoral head, enabling to estimate the path of the GP to the exit point of the perforation, in association with the depth needed to cross the acetabular far cortical (Figure 2D), based on the magnification calculations, as recommended by BOESE et al. (2015).
The procedure started by defining P1. It is important to mention that in limbs with femoral deformities there may be difficulties in obtaining this positioning (PETAZZONI & JAEGER, 2008), as noted in one case, which required four radiographic images to define P1. Consequently, this increased the execution time of M1.
The correct positioning of the GP has a great influence on the final result of the technique. In the present study, the introduction of the GP only in the femur near cortical in M2 allowed movements to correct the GP angulation. The longer time (median = 10.5 min) and number of radiographic images (median = 4.0) in M2 are justified by the need to switch from P1 to P2 and subsequent return to P1. In addition, adjustments in the angulation and positioning of the GP also affected the time and number of radiographic images performed. This was particularly noticeable in one of the cases in which more radiographic images were needed to achieve adequate positioning of the GP, resulting in longer execution times. TOMLINSON (2019) emphasized that for the repair of sacroiliac luxation using a minimally invasive approach guided by trans-surgical images, the correct positioning when introducing the GP reflects in the best positioning of the implant, reducing complications and generating early recovery for the patient.
The high median number of radiographic images and, consequently, the high median time observed in M3 can be justified by the time used to adjust the depth and check the GP measurements in relation to the magnification calculation (BOESE et al., 2015). It should be noted that, despite being a relatively long time, this is a fundamental step to achieve the objectives of the procedure, and if it is well executed, the chance of success will be greater. The lower median number of radiographic images and execution time of M4 is justified by the GP serving as a reference to the CD, making the step simpler and faster. This was only possible due to the previous calculation to establish the CD introduction depth (BOESE et al., 2015). Measurements of introduction depth, previously obtained preoperatively, as indicated by TOMLINSON (2019), can shorten the execution time and reduce the number of radiographic images at these moments.
In the implantation of the toggle pin (M5), it was noted that the median time was longer than expected since, initially, it was expected that the implantation would be performed without complications. However, obstructions in the canula of the CD demanded more radiographic images to confirm the passage of the toggle pin, which also increased the median time to complete this step. The incomplete passage of the toggle pin was also described by HELMICK et al. (2018). The main reason for this type of complication is the obstruction of the passage of the toggle pin by material deposited inside the canula of the CD. This could have been avoided by using a metallic pin for unclogging the CD with the same diameter as the canula of the CD, since the one used measured 2.2 mm and the internal diameter of the CD was 2.4 mm. This difference in diameter probably did not allow the complete removal of the material accumulated inside the CD and, therefore, hamper for the toggle pin to pass through.
The success rate obtained in the current study (57.1%; 8/14) was higher than that described by SEGAL et al. (2018), who performed similar research in twelve coxofemoral joints and obtained only 25.0% (3/12) of perforations in the round ligament topography. This study, which was guided by fluoroscopy and arthroscopy, applied calculations of angle of anteversion and inclination of the femoral head and neck, based on fluoroscopic images. In addition, this study employed goniometry as a drilling guide, using previously calculated angles. According to the authors, goniometry and fluoroscopy were unreliable for perforations, claiming that there is a possibility that angulation calculations could be inaccurate. Recently a study with three-dimensional printed drill guide to perform a similar technique in canine cadavers revealed that perforation placement occurred in the fovea in 15.0% (3/19) of cases. A partial deviation was observed in 63.0% (12/19) of cases, and the perforation was outside of the fovea in 21.0% (4/19) of the cases (DARROW et al., 2021).
In the present study, only radiographic examination was used to execute the perforations, obtaining only two cases (14.3%) of severe deviations and four cases (28.6%) of mild deviations. Severe deviations in drilling would probably cause functional impairment, as they could cause serious joint incongruity and cartilage damage. It is not possible to state that mild deviations would interfere with the integrity of joint mechanics, since little is known about the mechanical role of the round ligament and its function in the coxofemoral joint in dogs. In humans, there are some theories that question the role of the round ligament and there is a suspicion that its mechanical function is practically irrelevant (MARTIN et al., 2019). The absence of a functional round ligament was even observed in 2.80% of the evaluated human cadavers (UMAMAHESWARAN et al., 2022). There is a lack of studies in veterinary to assess the importance of the round ligament for the biomechanics of movement. This anatomical structure may play an important role in maintaining the joint during traumatic events in which the joint capsule and the regional musculature would not be able to sustain the joint fit, acting as a limiting agent of excessive movements. As the technique used in this study mimics the function of the round ligament, perhaps mild deviations do not exercise a great influence on joint congruence and limb movement.
During the execution of the technique, the excessive GP insertion was a concern to the procedure, compromising its safety. A study on 18 hips of human cadavers simulated the excessive GP insertion, demonstrating possible injuries. In 27.0% of the cases there was perforation of the sigmoid colon (FREITAS et al., 2010). In the present study, only one iatrogenic lesion was found, where the GP penetrated 3.2 cm into the pelvic canal, resulting in the positioning of the toggle pin inside the prostate of the cadaver. Such a complication could be avoided or minimized performing rectal palpation during the introduction of the GP, similar to the procedure performed by MCCARTNEY & MCGOVERN (2016). However, this should be performed with caution so as not to cause injury to the person performing the palpation. Further studies are suggested to define the safe limits for introducing the GP. Another recent study for arthroscopic-assisted hip toggle stabilization evaluating 14 joints of cat cadavers found no damage to intrapelvic structures after drilling (RUPÉREZ et al., 2023).
In the current study, a technique that mimics the function and anatomical arrangement of the round ligament with sutures was performed. These sutures, according to FLYNN (1994), are responsible for maintaining joint stabilization until restoration of adjacent tissues, such as the muscle group and joint capsule of the affected hip. It is possible that the function of the suture in the procedure of the present work is temporary, and it may be removed or even a medium/long-lasting absorbable material can be used, such as the procedure described by MARTINI et al. (2001), who used absorbable suture for coxofemoral stabilization in an extra-articular technique.
A possible limitation of this study is that, as this was an ex vivo study, some factors may have influenced the execution of the technique. The effect of freezing and thawing the cadavers could modify the joint mobility (KALIAPPAN et al., 2023). Furthermore, no assessment regarding the clinical follow-up of patients could be performed, as well as the evaluation of postoperative complications.
CONCLUSION
Minimally invasive technique for the stabilization of coxofemoral luxation, guided by radiographic images, with the use of a toggle pin, was possible to be executed in this study with canine cadavers. The next steps are technique improvement, to increase safety and reduce deviations in drilling, so that the possibility of performing the technique in live animals can be evaluated.
ACKNOWLEDGEMENTS
To Coordenação de Aperfeiçoamento de Pessoal de Nível Superior, Ministério da Educação (CAPES), Brazil - Finance code 001.
REFERENCES
-
BOESE, C. K. et al. Calibration markers for digital templating in total hip arthroplasty. PloS One, v.10, n.7, p.e0128529, 2015. Available from: <Available from: https://journals.plos.org/plosone/article?id=10.1371/journal.pone.0128529 >. Accessed: Mar. 15, 2021. doi: 10.1371/journal.pone.0128529.
» https://doi.org/10.1371/journal.pone.0128529.» https://journals.plos.org/plosone/article?id=10.1371/journal.pone.0128529 -
DARROW, B. G. et al. Accuracy of patient-specific 3D printed drill guides in the placement of a canine coxofemoral toggle pin through a minimally invasive approach. Veterinary and Comparative Orthopaedics and Traumatology, v.34, n.1, p.1-8, 2021. Available from: <Available from: https://www.thieme-connect.com/products/ejournals/abstract/10.1055/s-0040-1719169 >. Accessed: Jan. 02, 2022. doi: 10.1055/s-0040-1719169.
» https://doi.org/10.1055/s-0040-1719169.» https://www.thieme-connect.com/products/ejournals/abstract/10.1055/s-0040-1719169 -
DEMKO, J. L. et al. Toggle rod stabilization for treatment of hip joint luxation in dogs: 62 cases (2000-2005). Journal of the American Veterinary Medical Association, v.229, n.6, p.984-989, 2006. Available from: <Available from: https://avmajournals.avma.org/view/journals/javma/229/6/javma.229.6.984.xml >. Accessed: Jan. 15, 2021. doi: 10.2460/javma.229.6.984.
» https://doi.org/10.2460/javma.229.6.984.» https://avmajournals.avma.org/view/journals/javma/229/6/javma.229.6.984.xml -
DUDLEY, R. M. et al. Radiographic and computed tomographic determination of femoral varus and torsion in the dog. Veterinary Radiology & Ultrasound, v.47, n.6, p.546-552, 2006. Available from: <Available from: https://onlinelibrary.wiley.com/doi/abs/10.1111/j.1740-8261.2006.00184.x?casa_token=30x9ezD-OCAAAAAA:mwa837SdQW-pK1py-noxuonQyjD8D822j-BxZu_tuZQYeCrGPOivHw_oXgQSvAhapQSka6OC_aY0DA >. Accessed: Jul. 14, 2024. doi: 10.1111/j.1740-8261.2006.00184.x.
» https://doi.org/10.1111/j.1740-8261.2006.00184.x.» https://onlinelibrary.wiley.com/doi/abs/10.1111/j.1740-8261.2006.00184.x?casa_token=30x9ezD-OCAAAAAA:mwa837SdQW-pK1py-noxuonQyjD8D822j-BxZu_tuZQYeCrGPOivHw_oXgQSvAhapQSka6OC_aY0DA -
FLYNN, M. F. et al. Biomechanical evaluation of a toggle pin technique for management of coxofemoral luxation. Veterinary Surgery, v.23, n.5, p.311-321, 1994. Available from: <Available from: https://onlinelibrary.wiley.com/doi/abs/10.1111/j.1532-950X.1994.tb00490.x >. Accessed: Sept. 04, 2021. doi: 10.1111/j.1532-950X.1994.tb00490.x.
» https://doi.org/10.1111/j.1532-950X.1994.tb00490.x.» https://onlinelibrary.wiley.com/doi/abs/10.1111/j.1532-950X.1994.tb00490.x -
FREITAS, A. et al. Abdominal injuries due to the use of guide wire in hip surgery experiments. cadaveric study. Acta Ortopédica Brasileira, v.18, n.2, p.75-78, 2010. Available from: <Available from: https://www.scielo.br/j/aob/a/7yhGRqWQDyPrNgf73x39P6r >. Accessed: Jan. 02, 2021. doi: 10.1590/S1413-78522010000200003.
» https://doi.org/10.1590/S1413-78522010000200003.» https://www.scielo.br/j/aob/a/7yhGRqWQDyPrNgf73x39P6r -
HELMICK, J. I. et al. Evaluation of modified techniques for toggle pin repair of coxofemoral luxation in dogs: a cadaveric study. Veterinary and Comparative Orthopaedics and Traumatology, v.31, n.5, p.315-320, 2018. Available from: <Available from: https://www.thieme-connect.com/products/ejournals/abstract/10.1055/s-0038-1667064 >. Accessed: Sept. 08, 2020. doi: 10.1055/s-0038-1667064.
» https://doi.org/10.1055/s-0038-1667064.» https://www.thieme-connect.com/products/ejournals/abstract/10.1055/s-0038-1667064 -
HEO, S. Y.; LEE, H. B. Minimally invasive arthroscopic-assisted reduction with TightRope in a dog with coxofemoral luxation. Pakistan Veterinary Journal, v.34, n.4. p.551-553, 2013. Available from: <Available from: http://www.pvj.com.pk/pdf-files/34_4/551-553.pdf >. Accessed: Jul. 12, 2021.
» http://www.pvj.com.pk/pdf-files/34_4/551-553.pdf -
HYBKI, G. et al. Open hip reduction using a novel transarticular suture stabilization technique in 24 dogs: a retrospective study of technique, outcome and complications. New Zealand Veterinary Journal, v.70, n.3, p.177-183, 2022. Available from: <Available from: https://www.tandfonline.com/doi/abs/10.1080/00480169.2021.2016512 >. Accessed: Feb. 14, 2023. doi: 10.1080/00480169.2021.2016512.
» https://doi.org/10.1080/00480169.2021.2016512.» https://www.tandfonline.com/doi/abs/10.1080/00480169.2021.2016512 -
HUDSON, C. C. et al. Minimally invasive plate osteosynthesis: applications and techniques in dogs and cats. Veterinary and Comparative Orthopaedics and Traumatology, v.22, n.3, p.175-182, 2009. Available from: <Available from: https://www.thieme-connect.de/products/ejournals/abstract/10.3415/VCOT-08-06-0050 >. Accessed: Jun. 02, 2022. doi: 10.3415/VCOT-08-06-0050.
» https://doi.org/10.3415/VCOT-08-06-0050.» https://www.thieme-connect.de/products/ejournals/abstract/10.3415/VCOT-08-06-0050 -
KALIAPPAN, A. et al. Innovative cadaver preservation techniques: a systematic review. Maedica (Bucur), v.18, n.1, p.127-135, 2023. Available from: <Available from: https://www.ncbi.nlm.nhi.gov/pcm/articles/PMC10231151/ >. Accessed: Mar. 17, 2024. doi: 10.26574/maedica.2023.18.1.127.
» https://doi.org/10.26574/maedica.2023.18.1.127.» https://www.ncbi.nlm.nhi.gov/pcm/articles/PMC10231151/ -
KENDIG, S. M. S. et al. Coxofemoral luxation repair using a novel push anchor system in 10 dogs: technique and outcome. Veterinary and Comparative Orthopaedics and Traumatology, v.33, n.3, p.A1-A14, 2020. Available from: <Available from: https://www.thieme-connect.com/products/ejournals/html/10.1055/s-0040-1712870 >. Accessed: Mar. 17, 2024. doi: 10.1055/s-0040-1712870.
» https://doi.org/10.1055/s-0040-1712870.» https://www.thieme-connect.com/products/ejournals/html/10.1055/s-0040-1712870 -
MARTIN, R. L. et al. Clinical relevance of the ligamentum teres: a literature review. The International Journal of Sports Physical Therapy, v.14, n.3, p.459-467, 2019. Available from: <Available from: https://www.ncbi.nlm.nih.gov/pmc/articles/PMC6816302/pdf/ijspt-14-459.pdf >. Accessed: Apr. 04, 2022. doi: 10.26603/ijspt20190459.
» https://doi.org/10.26603/ijspt20190459.» https://www.ncbi.nlm.nih.gov/pmc/articles/PMC6816302/pdf/ijspt-14-459.pdf -
MARTINI, F. M. et al. Extra-articular absorbable suture stabilization of coxofemoral luxation in dogs. Veterinary Surgery, v.30, n.5, p.468-475, 2001. Available from: <Available from: https://onlinelibrary.wiley.com/doi/full/10.1053/jvet.2001.25875 >. Accessed: May, 02, 2023. doi: 10.1053/jvet.2001.25875.
» https://doi.org/10.1053/jvet.2001.25875.» https://onlinelibrary.wiley.com/doi/full/10.1053/jvet.2001.25875 -
MAYHEW, P. D. Complications of minimally invasive surgery in companion animals. Veterinary Clinics of North America: Small Animal Practice, v.41, n.5, p.1007-1021, 2011. Available from: <Available from: https://www.vetsmall.theclinics.com/article/S0195-5616(11)00099-4/fulltext >. Accessed: Oct. 22, 2021. doi: 10.1016/j.cvsm.2011.05.008.
» https://doi.org/10.1016/j.cvsm.2011.05.008.» https://www.vetsmall.theclinics.com/article/S0195-5616(11)00099-4/fulltext -
MAYHEW, P. D. et al. Comparison of surgical site infection rates in clean and clean-contaminated wounds in dogs and cats after minimally invasive versus open surgery: 179 cases (2007-2008). Journal of the American Veterinary Medical Association, v.240, n.2, p.193-198, 2012. Available from: <Available from: https://avmajournals.avma.org/view/journals/javma/240/2/javma.240.2.193.xml >. Accessed: Feb. 22, 2021. doi: 10.2460/javma.240.2.193.
» https://doi.org/10.2460/javma.240.2.193.» https://avmajournals.avma.org/view/journals/javma/240/2/javma.240.2.193.xml -
MCCARTNEY, W.; MCGOVERN, F. Unfavourable results from using the transarticular pin technique to stabilise luxated hips in 12 dogs under 8 kg. Veterinary Record, v.178, n.15, p.368, 2016. Available from: <Available from: https://bvajournals.onlinelibrary.wiley.com/doi/full/10.1136/vr.103319 >. Accessed: Dec. 20, 2021. doi: 10.1136/vr.103319.
» https://doi.org/10.1136/vr.103319.» https://bvajournals.onlinelibrary.wiley.com/doi/full/10.1136/vr.103319 -
ÖZAYDIN, I. et al. Reduction and stabilization of hip luxation by the transposition of the ligamentum sacrotuberale in dogs: an in vivo study. Veterinary Surgery, v.32, n.1, p.46-51, 2003. Available from: <Available from: https://onlinelibrary.wiley.com/doi/full/10.1053/jvet.2003.50009 >. Accessed: Mar. 14, 2021. doi: 10.1053/jvet.2003.50009.
» https://doi.org/10.1053/jvet.2003.50009.» https://onlinelibrary.wiley.com/doi/full/10.1053/jvet.2003.50009 - PETAZZONI, M.; JAEGER, G. H. Radiographic measurements of the femur. In: PETAZZONI, M.; JAEGER, G. H. Atlas of clinical goniometry and radiographic measurements of the canine pelvic limb. 2rd ed. Milan: Merial, 2008. p.34-42.
- PIERMATTEI, D. L. et al. The hip joint. In: PIERMATTEI, D. L. et al. Brinker, Piermattei, and Flo’s handbook of small animal orthopedics and fracture repair. 4rd ed. St. Louis: Saunders Elsevier, 2009. p.523-579.
-
ROCHELEAU, P. J. Arthroscopic placement of a toggle rod to correct coxofemoral luxation in a dog. Veterinary Surgery, v.47, n.7, p.970-974, 2018. Available from: <Available from: https://onlinelibrary.wiley.com/doi/full/10.1111/vsu.12937 >. Accessed: Apr. 06, 2021. doi: 10.1111/vsu.12937.
» https://doi.org/10.1111/vsu.12937.» https://onlinelibrary.wiley.com/doi/full/10.1111/vsu.12937 -
RUPÉREZ, J. E. et al. Arthroscopic-assisted hip toggle stabilization in cats: An ex vivo feasibility study. Veterinary Surgery, v.52, n.6, p.853-863, 2023. Available from: <Available from: https://onlinelibrary.wiley.com/doi/full/10.1111/vsu.13942 >. Accessed: Oct. 23, 2023. doi: 10.1111/vsu.13942.
» https://doi.org/10.1111/vsu.13942.» https://onlinelibrary.wiley.com/doi/full/10.1111/vsu.13942 -
SEGAL, U. et al. Minimally invasive technique for coxofemoral luxation stabilisation using transarticular toggle system: a cadaveric study. Journal of Small Animal Practice, v.59, n.3, p.154-160, 2018. Available from: <Available from: https://onlinelibrary.wiley.com/doi/10.1111/jsap.12765 >. Accessed: Mar. 25, 2022. doi: 10.1111/jsap.12765.
» https://doi.org/10.1111/jsap.12765.» https://onlinelibrary.wiley.com/doi/10.1111/jsap.12765 -
SIA, D. B. et al. Comparation between the technique of substitution of the round ligamentum by glycerin-preserved bubaline fascia lata implant and the use of transarticular pin in the redution and stabilization of experimentally induzed coxofemoral luxation in dogs. Arquivo Brasileiro de Medicina Veterinária e Zootecnia, v.61, n.4, p.823-825, 2009. Available from: <Available from: https://www.scielo.br/j/abmvz/a/Fv3JnQKxCTwjz5z9bbRfhzk/abstract/?lang=pt >. Accessed: Mar. 12, 2021. doi: 10.1590/S0102-09352009000400009.
» https://doi.org/10.1590/S0102-09352009000400009.» https://www.scielo.br/j/abmvz/a/Fv3JnQKxCTwjz5z9bbRfhzk/abstract/?lang=pt - THRALL, D. E. Introduction to radiographic interpretation. In: THRALL, D. E. Textbook of veterinary diagnostic radiology. 7rd. ed. St Louis: Elsevier, 2018. p.110-122.
-
TOMLINSON, J. Minimally invasive repair of sacroiliac luxation. Veterinary Clinics: Small Animal Practice, v.50, n.1, p.231-239, 2020. Available from: <Available from: https://www.vetsmall.theclinics.com/article/S0195-5616(19)30135-4 >. Accessed: Jul. 14, 2024. doi: 10.1016/j.cvsm.2019.09.004.
» https://www.vetsmall.theclinics.com/article/S0195-5616(19)30135-4 -
TROSTEL, C. D.; DEREK, B. F. Coxofemoral joint luxation in dogs treated with toggle rod stabilization: a multi-institutional retrospective review with client survey. Journal of the American Animal Hospital Association, v.56, n.2, p.83-91, 2020. Available from: <Available from: https://meridian.allenpress.com/jaaha/article-abstract/56/2/83/435283/Coxofemoral-Joint-Luxation-in-Dogs-Treated-with?redirectedFrom=fulltext >. Accessed: Oct. 13, 2022. doi: 10.5326/JAAHA-MS-6937.
» https://doi.org/10.5326/JAAHA-MS-6937.» https://meridian.allenpress.com/jaaha/article-abstract/56/2/83/435283/Coxofemoral-Joint-Luxation-in-Dogs-Treated-with?redirectedFrom=fulltext -
UMAMAHESWARAN, D. et al. Unilateral absence of the round ligament of femur - cadaveric case report. Journal of the Anatomical Society of India, v.71, n.2, p.151-153, 2022. Available from:<https://www.journals.lww.com/joai/fulltext/2022/71010/unilateral_abscence_of_the_round_ligament_of_femur__.13.aspx>. Accessed: Mar. 17, 2024. doi: 10.4103/jasi/jasi_210_21.
» https://doi.org/10.4103/jasi/jasi_210_21.» https://www.journals.lww.com/joai/fulltext/2022/71010/unilateral_abscence_of_the_round_ligament_of_femur__.13.aspx