Resumos
O desenvolvimento de processos de conformação para a melhoria da qualidade dos produtos, bem como a diminuição das perdas de matéria-prima e, também, da energia são os principais enfoques de várias pesquisas no Brasil e no exterior. Entre essas pesquisas está o processo Cross Wedge Rolling (CWR), que vem sendo estudado nos últimos anos para a substituição do recalque horizontal a quente na fabricação em uma única operação de eixos escalonados, pinos, eixos excêntricos e outros componentes. Esse processo é caracterizado pela deformação plástica de um tarugo cilíndrico pela ação de ferramentas em formato de cunha montadas sobre placas planas que se movem tangencialmente uma em relação à outra. O objetivo desse trabalho foi analisar o comportamento termomecânico de um aço laminado no CWR por simulação numérica e a evolução microestrutural dada pela simulação física. Os resultados mostram um comportamento do material de recristalização dinâmica e suas microestruturas do campo austenítico com aspectos de alto grau de refinamento.
Conformação de metais; método dos elementos finitos; evolução microestrutural
The improvement of manufacturing processes to assure product quality and reduce the amount of raw material and energy is the main objective of many recent researches. Some of them study cross wedge rolling (CWR) as a substitute to hot upsetting in the manufacture of stepped shafts, pins, eccentric shafts and many other mechanical parts. In this process a cylinder is deformed by two wedge tools assembled on plane plates that move tangentially one against the other. The main objective of this work is to study the thermomechanical behaviour of medium carbon steel during hot CWR by means of a numerical analysis. The numerical results will be compared to the microstructure of microalloyed steel samples which were submitted to CWR experimental tests. The results suggested that dynamic recrystallization was present during CWR and that microstructures in the austenitic region were very refined.
Metal forming; finite element method; microstructural evolution
v62n4a13
METALURGIA & MATERIAIS
Numerical and experimental analysis of the microstructural evolution during cross wedge rolling of V-Ti microalloyed steel
(Análise numérica e experimental da evolucão microestrutural durante a laminação transversal com cunha de um aço microligado ao V-Ti)
Wiliam RegoneI; Mário Luiz Nunes da SilvaII; Sérgio Tonini ButtonIII
IDoutor, Pesquisador Colaborador, Laboratório de Conformação Mecânica - FEM- UNICAMP E-mail: wilregone@uol.com.br
IIDoutor, Pesquisador Colaborador, Laboratório de Conformação Mecânica - FEM- UNICAMP E-mail: marioluiznunes@gmail.com
IIIProfessor Associado Laboratório de Conformação Mecânica - FEM- UNICAMP E-mail: sergio1@fem.unicamp.br
Resumo
O desenvolvimento de processos de conformação para a melhoria da qualidade dos produtos, bem como a diminuição das perdas de matéria-prima e, também, da energia são os principais enfoques de várias pesquisas no Brasil e no exterior. Entre essas pesquisas está o processo Cross Wedge Rolling (CWR), que vem sendo estudado nos últimos anos para a substituição do recalque horizontal a quente na fabricação em uma única operação de eixos escalonados, pinos, eixos excêntricos e outros componentes. Esse processo é caracterizado pela deformação plástica de um tarugo cilíndrico pela ação de ferramentas em formato de cunha montadas sobre placas planas que se movem tangencialmente uma em relação à outra. O objetivo desse trabalho foi analisar o comportamento termomecânico de um aço laminado no CWR por simulação numérica e a evolução microestrutural dada pela simulação física. Os resultados mostram um comportamento do material de recristalização dinâmica e suas microestruturas do campo austenítico com aspectos de alto grau de refinamento.
Palavras-chave: Conformação de metais, método dos elementos finitos, evolução microestrutural.
Abstract
The improvement of manufacturing processes to assure product quality and reduce the amount of raw material and energy is the main objective of many recent researches. Some of them study cross wedge rolling (CWR) as a substitute to hot upsetting in the manufacture of stepped shafts, pins, eccentric shafts and many other mechanical parts. In this process a cylinder is deformed by two wedge tools assembled on plane plates that move tangentially one against the other. The main objective of this work is to study the thermomechanical behaviour of medium carbon steel during hot CWR by means of a numerical analysis. The numerical results will be compared to the microstructure of microalloyed steel samples which were submitted to CWR experimental tests. The results suggested that dynamic recrystallization was present during CWR and that microstructures in the austenitic region were very refined.
Keywords: Metal forming, finite element method, microstructural evolution.
1. Introduction
During the last few years, many industries have been substituting hot upsetting by CWR to manufacture stepped shafts, pins and eccentric shafts, because CWR presents many advantages when compared to hot upsetting like better dimensional quality, better mechanical properties, high productivity, reduction of discards, easy automation, and lower levels of noise and vibration during operation.
In this process a cylindrical billet is deformed by two wedge tools assembled on plane plates or cylinders with a relative tangential movement to each other (Figure 1).
Stress and deformation states present in CWR are very complex comprehending radial compression, axial elongation and transverse shear stresses Weronski and Pater, 1992; Qiang Li et al, 2002 and Silva, Regone and Button, 2005.
Despite these many advantages, CWR is stable only within specific conditions related to part and tool geometry, process temperature, and strain rate. These parameters are correlated and the incorrect choice of process parameters can cause defects classified into three groups: internal (cavities and pores), superficial, and cross section deviations. The most common defect in CWR is the formation of a central cavity, also known as the Mannesmann effect Dean and Fu, 1993 and Danno and Tanaka, 1984.
During the hot forming of steel parts, the density of dislocations in the austenitic region is continuously reduced by thermal softening caused by dynamic recovery and recrystallization.
If recovery is the only softening mechanism, stress will raise until a stationary condition is achieved when a hardening-softening balance is established. Dynamic recovery is less likely to happen in metallic alloys with low stacking fault energy McQueen and Jonas, 1976.
Therefore, the dislocation density reaches a value high enough to initiate dynamic recrystallization when a critical strain is achieved. Then a stress peak is observed with a subsequent and continuous reduction of strain hardening. The softening rate then reaches a maximum value and flow stress is reduced to a stationary state and a refined microstructure is formed Regone, Jorge and Balancin, 2000.
The main objective of this work is to study the thermomechanical behaviour of medium carbon steel when deformed by hot CWR. Numerical analysis with commercial finite element software was done to simulate the process and to evaluate the variation of temperatures, strains and stresses. Experimental tests with CWR were carried out to analyze the microstructural evolution of Ti-V microalloyed steel deformed in the austenitic region, and to study the products of the austenite transformation in the CWR products.
2. Materials and methods
2.1 Experimental analysis
Cylindrical billets of microalloyed steel with the chemical composition shown in Table 1 and with a size of 17 mm in diameter and 90 mm in length were machined. The billets were heated to 1150ºC, using a soaking time of 20 minutes. Thereafter the billets were rolled at 200 mm/s in CWR equipment (Figure 2) Gentile, 2004 and then air- or water-cooled. Samples were cut in the medium cross-section region for microstructural analysis.
The water-cooled samples were polished and etched with an aqueous solution, containing picric acid and detergent, at 80ºC during 60 to 120 seconds, to reveal the prior austenitic grains. On the other hand, air-cooled samples were polished and etched with Nital 2% to reveal the microstructures formed by the austenite decomposition. The samples were analyzed by optical microscopy and the volumetric fraction of the present phases was determined in accordance with the ASTM E-562 standard.
2.2 Numerical analysis
Commercial software was used to simulate CWR with the finite element method. Medium carbon steel was defined in the numerical analysis instead of the microalloyed steel, since results from previous studies showed that both steels present similar thermomechanical properties.
The billet and tools were modelled to a three-dimensional analysis, considering the billet material as an elasto-plastic material and the tools as a rigid material. The process conditions were simulated to be similar to those of the experimental tests (temperature, rolling speed, friction coefficient, thermal constants, and material properties).
To analyze some process variables (like effective strain, effective stress, temperature and effective strain rate) five points were selected along the workpiece as shown in Figure 3. These points, located in the medium longitudinal plane of the billet, present the evolution of the billet on the CWR tool during the process. P1 is the point at the centre of the workpiece, points P2 and P3 are located along the radius with P3 being the more distant to the center and the nearest to the surface. Points P4 and P5 are in the workpiece axis and near to the end of the billet.
3. Results and discussion
3.1 Numerical results
Figures 4a and 4b show the evolution of billet temperature and effective strain during rolling. Figure 5 shows the effective strain in points P1 to P5 as a function of rolling time. Deformation begins with the contact between billet and tools, and is gradually increased in all points. If results in points P2 and P3 are compared to P1, a greater deformation in P3 is observed, since this point is the nearest to the billet surface along the radial direction and is closer to the tool surfaces. Points P4 and P5 present smaller strains because they are far from the billet centre and just experience lateral deformation (points beyond P5 must show no deformation keeping the billet with a constant diameter in that region).
Equivalent strains present during CWR are usually greater than in other metal forming processes because of multi-axial deformations present in that process. It can be assumed that these greater deformations are beneficial to reaching the critical deformation necessary to activate the mechanisms that initiate dynamic recrystallization.
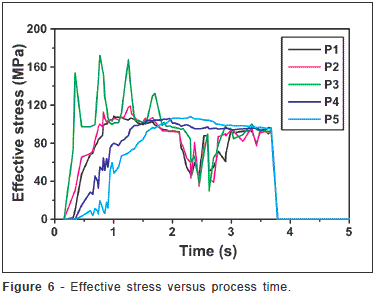
During CWR a complex stress state with compressive and tensile stresses is established after some revolutions of the billet. Figure 6 shows the effective stress calculated for points P1 to P5 as a function of process time.
For points P1, P2 and P3, equivalent stress presents a similar cyclic behaviour with significant variation of stress for each moment the billet touch the dies. Also observed is an initial period of stress increase when points P1 to P3 are directly under (or above) the tool wedge, followed by a period of stress decrease when the tool edge moves away from these points. Point 3 shows the most significant variation in the maximum and minimum stresses because the greater deformation observed in this point associated to cyclic behaviour.
Points P4 and P5 present a different behaviour. There is an initial increase of stress that remains constant till the end of the process, since these points mainly experience axial deformation that causes billet elongation. Therefore, for points P4 and P5, equivalent stresses are directly related to axial tensile stress.
Significant thermal processes occur during CWR: heat is transferred between billet and tools, also generated by the deformation, and finally transferred by convection to the atmosphere. The variation of temperature caused by these conditions is important information for understanding the changes of microstructure and mechanical properties that happen along the process.
The temperature variation within the billet during CWR is shown in Figure 7a, again for the points P1 to P5.
Points P1 and P2 show an initial increase of temperature caused by the heat generated by billet deformation and then a small decrease caused by heat conduction along the billet.
The same behaviour is observed for point P4 with a small delay because this point is further from the centre of the billet than P1 and P2. The variation of temperature in P5 is almost negligible; the small temperature increase is balanced by the decrease caused by convection.
Like in the analysis of the equivalent stress, point P3 presents a significant variation of temperature in the process beginning, again caused by the cyclic behaviour of the process and by the higher deformation observed for this point. The intense heat transfer between tools and billet causes the significant temperature decrease observed in P3, followed by a temperature increase due to the heat generated by metal deformation.
These observations can be confirmed in Figure 7.b that shows the variation of temperature as a function of the equivalent strain.
During CWR, the microstructure of each region of the billet is affected by these changes in strain, stress and temperature, and especially in strain rate that defines the process time available for thermal mechanisms like phase transformation, dynamic recovery and recrystallization, and grain growth.
Figure 8 shows the variation of effective strain rate as a function of the process time. At the process beginning, high strains are developed in short times and therefore high strain rates are observed in point P3 with each billet-tool contact. Points P1 and P2 also show the same behaviour at smaller rates. At points P4 and P5, there are low strains during the process and consequently smaller and almost negligible strain rates.
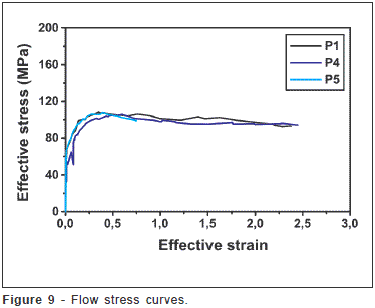
Flow stress during hot deformation is strongly influenced by these process variables as can be observed in Figure 9 for points P1, P4 and P5. Initially flow stress increases due to strain hardening, then a critical deformation is reached and a stress peak is observed corresponding to dynamic recrystallization. Thereafter a steady state is established by the balance between strain hardening and thermal softening McQueen and Jonas, 1976 and Jonas, 1994.
3.2 Experimental results
a) Microstructural analysis of water-cooled samples
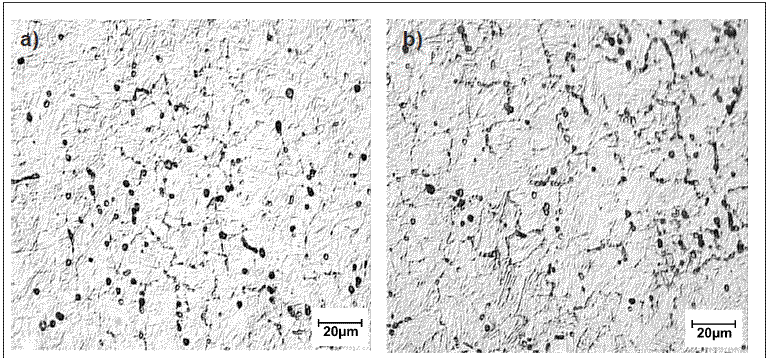
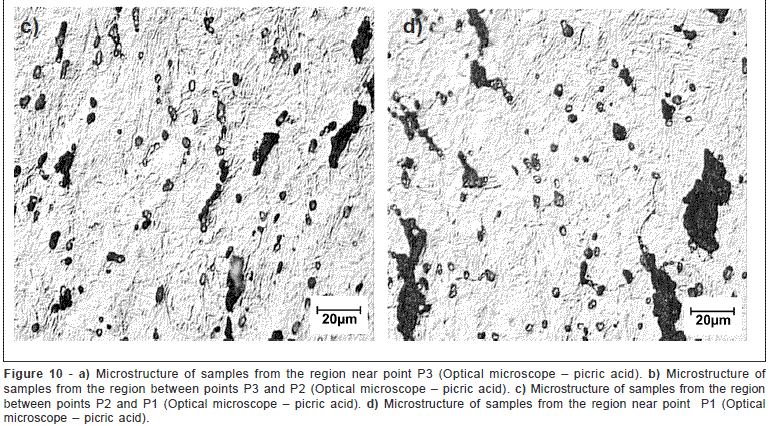
Figures 10a to 10d present the microstructures of representative samples from the surface to the centre of the workpiece, respectively. All the micrographs were observed in the autenitic region after CWR and water-cooling.
These micrographs were randomly selected among many samples presenting similar microstructures. In all these micrographs, it was very difficult to reveal the austenite grain boundaries and to define their morphology or orientation because they were very refined due to the high strains and strain rates shown in Figures 5 and 8.
In Figures 10c and 10d, the dark regions represent the central cavities generated by the Mannesmann effect Silva, Regone and Button, 2005. One important observation in these figures is that the cavities are isolated and not connected by small cracks.
b) Microstructural analysis of air-cooled samples
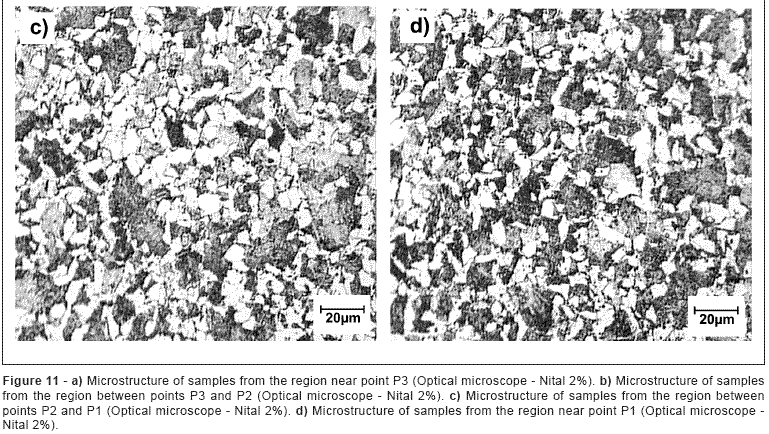
Figures 11a to 11d present the microstructures of representative samples from the surface to the centre of the workpiece, respectively. All the micrographs were observed in samples CWR rolled and air-cooled. They present a microstructure formed by pearlite and ferrite grains.
Figure 11a shows the microstructure near the billet surface with refined ferrite grains (mean size near to 5 µm) also shown in Figure 11b. In Figure 11c, near the billet centre, the coarsening of the pearlite colonies is observed, which is also observed in the centre of the billet near the large cavities. Despite the complex stress state present in CWR, no other phases were formed by the austenite decomposition.
Table 2 shows the measured proportion (with M - mean of five measures and s - standard deviation) of ferrite and pearlite present in the air-cooled samples related to the microstructures shown in Figures 10a to 10d.
It is observed that pearlite increases toward the billet centre, which can be explained by the larger strains observed in the surface (Point 3) that possibly generate a large number of sites for the nucleation of ferritic grains as confirmed by the numerical results shown in Figure 8 for the flow stress in that point.
4. Conclusions
Numerical analysis of the CWR process provided good results for the gradients of equivalent strain, stress, temperature and strain rate and allowed prediction of the microstructural evolution in the microalloyed steel by the evaluation of the stress flow curve.
Microstructural analysis showed that CWR promoted an intense refinement of the austenite grains during deformation, and that central cavities are formed from isolated nuclei present near the center line of the workpiece.
Experimental results also showed microstructures with a larger proportion of pearlitic phase in samples near the centre of the billet. This can be explained by the high amount of strain and large strain rates at the billet surface that promoted the nucleation and recrystallization of ferritic grains in that region.
5. Aknowledgments
Authors wish to thank FAPESP - Fundação de Amparo à Pesquisa do Estado de São Paulo and CNPq - Conselho Nacional de Desenvolvimento Científico e Tecnológico, for their financial support to this work.
6. References
Artigo recebido em 09/10/2008 e aprovado em 21/08/2009.
- DANNO, A., TANAKA, T. Hot forming of stepped shafts by wedge rolling with three rolls. Journal of Mechanical Working Technology, v.9, p.21-35, 1984.
- DEAN, T. A., FU, X. P. Past developments, current applications and trends in the cross wedge rolling process. International Journal of Machine Tools and Manufacture, v.33, n.3, p.367-400, 1993.
- GENTILE, F.C. Estudo do processo de laminaçăo cruzada com cunha (cross wedge rolling) para fabricaçăo de eixos escalonados UNICAMP, agosto de 2004. (Tese de Doutorado).
- JONAS, J. J. Dynamic recrystallization-scientific curiosity or industrial tool? Mat. Scie. and Eng., v. A184, p. 155-165, 1994.
- McQUEEN, H. J., JONAS, J. J. Recovery and recrystallization during high temperature deformation. In: ARSENAUT, R. J. (ed.). Treatise on Materials Science and Technology New York: Academic Press, 1976. v. 6, p. 393-493.
- QIANG LI, LOVELL, M. R., SLAUGHTER, W., TAGAVI, K. Journal of Materials Processing Technology, p. 125-126, 248-257, 2002.
- REGONE, W., JORGE JÚNIOR, A.M., BALANCIN, O. Metodologia para determinar os tipos de amaciamentos que atuam em processos termomecânicos CBECIMAT, 14. Săo Pedro - SP, 3 a 6 de dezembro de 2000.
- SILVA, M.L.N. DA, REGONE, W., BUTTON, S.T. Microstructure and mechanical properties of microalloyed steel forgings manufactured from cross-wedge-rolled preforms. Scripta Materialia, v. 54, p. 213-217, 2005.
- WERONSKI, W., PATER, Zb. Selection of geometric parametrs of transverse wedge rolling tools. Journal of Materials Processing Technology, v. 34, p. 273-280, 1992.
Datas de Publicação
-
Publicação nesta coleção
19 Mar 2010 -
Data do Fascículo
Dez 2009
Histórico
-
Aceito
21 Ago 2009 -
Recebido
09 Out 2008


